
Next Tutorial
Android Animation Interpolators, with Spinner
Prev Page
View All Tutorials
This is the App Photo - View Animation

For this Tutorial, you can download the App
Click Here to Download

Once it gets to -350, it then moves to the position it started at, center
If you want the image to move to the right, you would code 350, instead of -350.

View Animation is one of the three animation APIs used in android; also known as Tween Animations. In the previous tutorials you learned how to code a frame animation, the simplest and least customizable of the three animation code classes.
The View Animation lets you animate anything that is a view object. You can animate an image you added, a shape drawable you created, or just a TextView with some text. There are a number of methods you can use to animate such as Rotate, Scale, Alpha, and Translate.
You can also control the duration (speed) of your animation. You can use just one of the methods or you can group them together and use several of them. As well, you can have all your methods animate at the same time, or have them animate sequentially.
Each method creates a different animate effect. The Rotate method, rotates your view object using degrees, x and y pivots, and duration. The Scale method adds size dimension to your object. You can scale it to resize itself, also using x and y pivots and duration. The translate method moves your view object vertically or horizontally, and you can also add a duration. The alpha methods changes the opacity of your image.
Another feature you can add to your animation is an 'interpolator'. This controls the rate of change in an animation. For example; for this app tutorial, we have an image moving across the view, then returning to its original position. It moves steadily and evenly across the view.
By applying an interpolator to our animated image, we can have it move differently. Some interpolator methods you can use are: accelerate, decelerate, repeat, bounce, anticipate, or overshoot. With the interpolator method added, it will move at a different rate across the view. A interpolator is added to your animation element as such:
android:interpolator="@android:
anim/decelerate_interpolator"
Additional reading Interpolators
In our next tutorial, Animation Interpolators, with Spinner, you can see how the different interpolators animate.
For this app tutorial, our View Animation app, we are coding the Translate method, where we add code for our abstract image so that it moves across the view to the left; then returns to its starting position at center.
We have also included Example Code for the Scale and Rotate methods; which you can use in your app by replacing the translate method code with either of them, or you can use all three methods together; Translate, Rotate, Scale; by adding them all in a set.
For additional reading on View Animations,
Translate Animation
Animation Resource Guide
For the image used in this app, we used GIMP to create an abstract image. Basically we created a white square image, added various colors to it; then used the cubism feature in the Filters to cubify the colors which resulted in the abstract look of the image.
The image we use, myexample.png, is put into the res/drawable folder. This folder has to be created also.
In AIDE; goto right side Select dots, then Select 'create new folder', type folder name then Select ok. Your folder is now created.
Note; You must be at the res/ folder in your app project; then create these 2 folders.
Material Design Theme
For each template android/gradle/java/xml app you create:
By default;
The res/values-v21 styles.xml file has the code for the material design theme name: Theme Material Light; for devices using android version 5.0, Api 21 or latest.
The res/values styles.xml file has the code for the theme name: Theme Holo Light, which is for devices that are pre material design platforms; ie less than android version 5.0 Api 21.
For this app tutorial, we want to use the
Theme Material Light
This theme has a light colored view with a light colored action bar. The action bar is at the top of the app view, where you can see the app name.
The code for this is shown in this image.
We need to change the code to read Theme.Material Light, in our styles.xml file located at res/values-v21 of the app project.
For devices using android 5.0 Api 21, or later versions, they will now see the Theme.Material.Light
For users of devices that are pre or before android 5.0 Api 21, they will have the Theme.Holo.Light as their theme. We need to change the theme to read Theme.Holo.Light at the res/values/styles.xml file.
You can copy paste the code for these themes at the Example Code section on this page.
Create New Project;
Then, choose
New Android App(gradle, android Java/xml)
or
Hello World App Java/xml
if your using the original version of AIDE
You can name your app, use;
View Animation for the App Name and,
for the package name(next line) use:
com.aac.animationexample
Layout 1 layout file, main.xml; this page has the code for our View Animation layout; located at res/layout/main.xml, already created, just replace the code on this page with the code from our Example Code section and save the page.
myanimations.xml this file has the code for the animation.
In this xml file you add the code for the 'Translate' animation. The xml file must be put into the anim folder of your app project at res/anim. You have to create the
anim folder. Then create your xml page. For this tutorial we named it, myanimations.xml
The xdelta is the horizontal animation, and the ydelta is the vertical animation. Because we want our image to move left we put a - in front of our number, -350. If we wanted it to move to the right, then we would have coded 350.
The duration is the time is takes for the animation to complete. If you use a smaller number then the animation is completed sooner than a larger number.

Copy and paste the code for this page from our Example Code section, save the page.
Images
res/drawable folder. At the drawable folder we add our image for this app:
myexample.png
You can save this image at the Example Code section, then paste it into your res/drawable folder.
You can create this folder.
Java 1 java class page; MainActivity.java; located at app/src/java/MainActivity.java. This page has the code that will initiate the animation and the onclick method for the button.
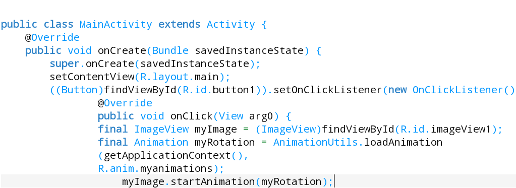
Looking at this image of the code, you can see the findViewByID code for the Button that we coded with the resource id of button1 from our Layout element. In this code we attach this id name from our layout button element to the onClickListener code to implement the Button Click.
Imports
Each java class code method you add has a corresponding import statement that has to be coded in your apps java page.
The default java page created for this app is named MainActivity.java. This is where we put the import statements.
If you were to add additional java class pages to your app, then you would add import statements to those also.
Default import statements are added to each new page created. However, once we add additional code classes and methods like 'animation', then import statements must be added manually. Android does not add them for us.
Each android template app we create has the common required 'import' statements, like:
import android.app;
import android.os;
import android.view.view;
These are the most common ones; as all apps have one page, one view, and an os.
These are coded at the top of the java class page.
Looking at this image, you can see the import statements we included for our animation app project.
This is an image of the import codes on the MainActivity.java page

In our MainActivity.java, we have these code classes,- onClickListener, Animation, Animation Utilities, and Object Animator; therefore, we added import statements for them.
You can copy paste the code from the Example Code section to replace the code that's on the java page now and save the page.
When you code with AIDE you will no doubt from time to time get 'error messages'. The import statements code is a good place to look for errors, because you may have not included a required import for the code classes your implementing.
The good thing about import statements is that you can only input the correct import name. It won't allow an incorrect name to be added.
Strings 1 strings.xml file; This file has the strings that contains the app_name text - View Animation
Build Gradle, this page has the code for the SDK min and target versions and our support libraries code if we need to add any to our app. The support libraries code is added at the 'dependencies' section in the build.gradle file, and the SDK versions are added at the 'defaultConfig' section in the build.gradle.
This file has been created for us and coded with the SDK min 14, and target version 21; we don't have to edit those as our 'animation code class' does not require a specific api or any support libraries that could require a specific api.
For this app, the build.gradle file is located at; AppProjects/ViewAnimation/app/.
Manifest The androidmanifest.xml page is where you can code your 'app theme' name, code your 'intent filters', change your 'app logo', add individual 'page titles', and declare any additional java class pages.
You can also code your SDK min and target versions here for your app, but since they are already coded in the build.gradle, they do not need to be coded here.
Coding For Compatibility
The Material Design platform was introduced in android 5.01 which is api 21, for coding purposes Sdk version 21. Each android platform build version has a API assigned to it.
You can find the android platform version of your android device at: Settings, AboutPhone.
And, for some apps we develop, we have to add 'support libraries'. To learn about setting your SDK versions, and adding support libraries (dependencies), goto
Tutorial 1 - AndroidManifest and Build Gradle
Android Animation Interpolators, with Spinner
Prev Page
View All Tutorials
View Animation With Button
This is the App Photo - View Animation
For this Tutorial, you can download the App
Click Here to Download
How To Use View Animation
This 'Translate' animation example moves the image to the left
Once it gets to -350, it then moves to the position it started at, center
If you want the image to move to the right, you would code 350, instead of -350.
View Animation is one of the three animation APIs used in android; also known as Tween Animations. In the previous tutorials you learned how to code a frame animation, the simplest and least customizable of the three animation code classes.
The View Animation lets you animate anything that is a view object. You can animate an image you added, a shape drawable you created, or just a TextView with some text. There are a number of methods you can use to animate such as Rotate, Scale, Alpha, and Translate.
You can also control the duration (speed) of your animation. You can use just one of the methods or you can group them together and use several of them. As well, you can have all your methods animate at the same time, or have them animate sequentially.
Each method creates a different animate effect. The Rotate method, rotates your view object using degrees, x and y pivots, and duration. The Scale method adds size dimension to your object. You can scale it to resize itself, also using x and y pivots and duration. The translate method moves your view object vertically or horizontally, and you can also add a duration. The alpha methods changes the opacity of your image.
Another feature you can add to your animation is an 'interpolator'. This controls the rate of change in an animation. For example; for this app tutorial, we have an image moving across the view, then returning to its original position. It moves steadily and evenly across the view.
By applying an interpolator to our animated image, we can have it move differently. Some interpolator methods you can use are: accelerate, decelerate, repeat, bounce, anticipate, or overshoot. With the interpolator method added, it will move at a different rate across the view. A interpolator is added to your animation element as such:
android:interpolator="@android:
anim/decelerate_interpolator"
Additional reading Interpolators
In our next tutorial, Animation Interpolators, with Spinner, you can see how the different interpolators animate.
For this app tutorial, our View Animation app, we are coding the Translate method, where we add code for our abstract image so that it moves across the view to the left; then returns to its starting position at center.
We have also included Example Code for the Scale and Rotate methods; which you can use in your app by replacing the translate method code with either of them, or you can use all three methods together; Translate, Rotate, Scale; by adding them all in a set.
For additional reading on View Animations,
Translate Animation
Animation Resource Guide
GIMP For Image Creation and Editing
GIMP is a free open source creating and editing editor for graphics. With GIMP you can make images, add borders, text, and many special effect filters can be added as well.For the image used in this app, we used GIMP to create an abstract image. Basically we created a white square image, added various colors to it; then used the cubism feature in the Filters to cubify the colors which resulted in the abstract look of the image.
Creating The Anim Folder
For view animations, an xml file has to be created, myanimations.xml; then add the code for the animation method, and save the file at the res/anim folder of your app project. The res/anim folder has to be created.The image we use, myexample.png, is put into the res/drawable folder. This folder has to be created also.
In AIDE; goto right side Select dots, then Select 'create new folder', type folder name then Select ok. Your folder is now created.
Note; You must be at the res/ folder in your app project; then create these 2 folders.
Material Design Theme
For each template android/gradle/java/xml app you create:
By default;
The res/values-v21 styles.xml file has the code for the material design theme name: Theme Material Light; for devices using android version 5.0, Api 21 or latest.
The res/values styles.xml file has the code for the theme name: Theme Holo Light, which is for devices that are pre material design platforms; ie less than android version 5.0 Api 21.
For this app tutorial, we want to use the
Theme Material Light
This theme has a light colored view with a light colored action bar. The action bar is at the top of the app view, where you can see the app name.
The code for this is shown in this image.
We need to change the code to read Theme.Material Light, in our styles.xml file located at res/values-v21 of the app project.
For devices using android 5.0 Api 21, or later versions, they will now see the Theme.Material.Light
For users of devices that are pre or before android 5.0 Api 21, they will have the Theme.Holo.Light as their theme. We need to change the theme to read Theme.Holo.Light at the res/values/styles.xml file.
You can copy paste the code for these themes at the Example Code section on this page.
Creating - Naming Your App Using AIDE
When creating your app,(from left menu) choose:Create New Project;
Then, choose
New Android App(gradle, android Java/xml)
or
Hello World App Java/xml
if your using the original version of AIDE
You can name your app, use;
View Animation for the App Name and,
for the package name(next line) use:
com.aac.animationexample
The Coded Pages
For this app you will use these coded pages:Layout 1 layout file, main.xml; this page has the code for our View Animation layout; located at res/layout/main.xml, already created, just replace the code on this page with the code from our Example Code section and save the page.
myanimations.xml this file has the code for the animation.
In this xml file you add the code for the 'Translate' animation. The xml file must be put into the anim folder of your app project at res/anim. You have to create the
anim folder. Then create your xml page. For this tutorial we named it, myanimations.xml
The xdelta is the horizontal animation, and the ydelta is the vertical animation. Because we want our image to move left we put a - in front of our number, -350. If we wanted it to move to the right, then we would have coded 350.
The duration is the time is takes for the animation to complete. If you use a smaller number then the animation is completed sooner than a larger number.
Copy and paste the code for this page from our Example Code section, save the page.
Images
res/drawable folder. At the drawable folder we add our image for this app:
myexample.png
You can save this image at the Example Code section, then paste it into your res/drawable folder.
You can create this folder.
Java 1 java class page; MainActivity.java; located at app/src/java/MainActivity.java. This page has the code that will initiate the animation and the onclick method for the button.
Looking at this image of the code, you can see the findViewByID code for the Button that we coded with the resource id of button1 from our Layout element. In this code we attach this id name from our layout button element to the onClickListener code to implement the Button Click.
Imports
Each java class code method you add has a corresponding import statement that has to be coded in your apps java page.
The default java page created for this app is named MainActivity.java. This is where we put the import statements.
If you were to add additional java class pages to your app, then you would add import statements to those also.
Default import statements are added to each new page created. However, once we add additional code classes and methods like 'animation', then import statements must be added manually. Android does not add them for us.
Each android template app we create has the common required 'import' statements, like:
import android.app;
import android.os;
import android.view.view;
These are the most common ones; as all apps have one page, one view, and an os.
These are coded at the top of the java class page.
Looking at this image, you can see the import statements we included for our animation app project.
This is an image of the import codes on the MainActivity.java page
In our MainActivity.java, we have these code classes,- onClickListener, Animation, Animation Utilities, and Object Animator; therefore, we added import statements for them.
You can copy paste the code from the Example Code section to replace the code that's on the java page now and save the page.
When you code with AIDE you will no doubt from time to time get 'error messages'. The import statements code is a good place to look for errors, because you may have not included a required import for the code classes your implementing.
The good thing about import statements is that you can only input the correct import name. It won't allow an incorrect name to be added.
Strings 1 strings.xml file; This file has the strings that contains the app_name text - View Animation
Build Gradle, this page has the code for the SDK min and target versions and our support libraries code if we need to add any to our app. The support libraries code is added at the 'dependencies' section in the build.gradle file, and the SDK versions are added at the 'defaultConfig' section in the build.gradle.
This file has been created for us and coded with the SDK min 14, and target version 21; we don't have to edit those as our 'animation code class' does not require a specific api or any support libraries that could require a specific api.
For this app, the build.gradle file is located at; AppProjects/ViewAnimation/app/.
Manifest The androidmanifest.xml page is where you can code your 'app theme' name, code your 'intent filters', change your 'app logo', add individual 'page titles', and declare any additional java class pages.
You can also code your SDK min and target versions here for your app, but since they are already coded in the build.gradle, they do not need to be coded here.
Coding For Compatibility
The Material Design platform was introduced in android 5.01 which is api 21, for coding purposes Sdk version 21. Each android platform build version has a API assigned to it.
You can find the android platform version of your android device at: Settings, AboutPhone.
Summary, SDK - Dependencies
For most apps you build, you will need to have the proper SDK min and target version coded in either the build.gradle file or the AndroidManifest.xml page. At this time, it is added at Build gradle for the 'template' apps we create.And, for some apps we develop, we have to add 'support libraries'. To learn about setting your SDK versions, and adding support libraries (dependencies), goto
Tutorial 1 - AndroidManifest and Build Gradle
EXAMPLE CODE - Code For This Tutorial
JUST copy the code for this tutorial App Name is 'View Animation' - located at AppProjects/ViewAnimation in AIDE, open the AIDE app, then open App Projects, THEN select the 'ViewAnimation' app from your files hierachy(left menu); then click on any file from the app, like strings.xml Make sure at top of page, the app name ViewAnimation is there next to AppProjects like so: AppProjects/ViewAnimation , then you know you have the proper App.
JUST copy the code for this tutorial App Name is 'View Animation' - located at AppProjects/ViewAnimation in AIDE, open the AIDE app, then open App Projects, THEN select the 'ViewAnimation' app from your files hierachy(left menu); then click on any file from the app, like strings.xml Make sure at top of page, the app name ViewAnimation is there next to AppProjects like so: AppProjects/ViewAnimation , then you know you have the proper App.
Once a file is in the editor, you can edit, save it, then RUN your APP, Install,
and Open your app.
Make sure you SAVED EACH PAGE,(or choose automatic saving in AIDE settings) before you RUN your code. SAVE, RUN, INSTALL, OPEN, your App. Once it has been
installed on your tablet, you can open it Simply by Clicking on the Android little green App Icon,with the wording 'ViewAnimation' on your tablet. It will
be with your other installed apps.
If you make further changes to this App, you need to SAVE, RUN, UPDATE, INSTALL, then OPEN the app.
This free script provided by
JavaScript
Kit
AIDE for creating Android Apps on your tablet or cell phone(android).
Free and Paid.
GoTo Aide
ANDROID STUDIO - for creating Android Apps on your desktop computer.
Free to Install and Use
Learn more - Android Studio
The Java XML files we code(example codes) and the Android Apps we create in our Free Tutorials are compatible with Android Studio and AIDE. Just choose Java XML as your Programming Language.
You May Like:
Sushi Rolls Make Sushi at Home
Pro Tips Photography