
New Tutorial 2022
Android Tutorial -
ImageButton To Link(SmartLink) Example
Added September 2022
For this tutorial, we are going to learn how to code a imagebutton to web link that when clicked goes to a web address url. For the url you can use any web address you like, simply swap out the url in the java class code. Because we want to use our imagebutton as an 'mobile advertising banner', we are going to add an image to it, and place it at the top of our view. Specifically, we are adding advertising banner for a 'Smartlink'. When a user clicks on the banner, they are taken to whatever web url you have entered into your code.
SmartLinks For Publishers
Nowadays, affiliate publishers have a sleuth of ad vertical choices for their web properties, be it websites, social media, and in their mobile apps. Common ad types include banners, full page ads, delayed ads, video ads, native ads, popups ads, push notifications, and, the easy to implement and device targeted 'smartlink'.Smartlinks are just as the name indicates. They can determine a lot of things about a users demographic including country, device type, age, and so on. A smartlink is of itself just a plain ordinary link, which is why it is so easily placed just about anywhere a publisher might want to use it. And, because it can effectively utilize just about any type of traffic, it can help to monetize traffic that perhaps would not be otherwise.
With mobile apps, ads are usually added by implementing an SDK integration. However, with smartlinks, the process of adding advertising to your app is much simpler; you need only add the html link to your app code. Smartlinks are cross platform compatible, so you can use the same 'publisher ad network'; and the same smartlink html link, for your website, mobile apps, and social media accounts. Smartlinks are mobile ready; meaning they show great no matter what screen size they are shown on - be it a small smartphone, a tablet, or desktop website.
You can utilize smartlinks as text banners, or add your own creatives to make them more appealing. As long as it complies with your advertisers' guidelines; you can design your smartlinks as you like.
Smartlink Features
The good news is because they are device specific, they can utilize just about any type of traffic which is good for the publisher. However, when designing your buttons for a smartlink, there are a few things to consider. Firstly, the ads presented in a Smartlink are device targeted; so you are not likely to know what advertising vertical or genre is going to be shown to your users. That means your banners or creatives should be 'general' in wording. Wording like: Download, Play, Deals, Daily Deals, Discounts, are probably a better choice than using words like: Free, Free Trial, No Credit Card Required.The idea is to entice the user to click on a advert but at the same time you don't want to annoy them by selling them false or misrepresented advertising. Your ad network has guidelines that most likely stipulate this as well.
ImageButton for Smartlink
For the previous tutorial we learned how to add a text banner with a smartlink to the top of our view. In this tutorial, we will implement an 'imagebutton' and add a smartlink to it. With an image button, we can add our own image to the button; which allows us to be as creative as we want.ImageButton Banner
For the image button banner we make in this app, we can easily add the publisher link code to the coding, so that when a user clicks on the banner they are taken to the advertising landing page. And, if the user decides to buy, watch, or subscribe to something that they are offered, you make a commission from that. The commission for a publisher is based on the type of ad the user interacted with. Some are cost per install, others cost per action, and also popular is cost per lead. Any of these can make you money. As well, there is a sleuth of advertising verticals, and styles, for you to choose from to put on your web properties.Freebies For Creating Banners
There are lots of choices for making yourself some free banners for your publishing efforts online. Images can be expensive at the established photography websites; however, there are websites that offer 'freebies' you can use for your creatives.The websites I often browse are Pexels.com, Pixabay.com, and FreePik.com You can do searches for topic categories, then once you've selected your image, you can choose an image size before you download the image. Small image sizes are great for banners,(500-600px). Any of these websites only require a 'courtesy link' for using their image database. You can simply select the 'copy' button to get the 'Courtesy Credit' code for your website. Some offer unlimited downloads daily, while others it's limited downloads per day, however, if you join (for free) you can select more images to download per day. And, their paid membership is quite affordable compared to the Big Brand photos websites.
Selected Images
Once you've selected your images; just use a desktop or mobile photo editing app; to make your masterpieces. There are plenty of these free at GooglePlay to choose from. Ideally, you'd want an app that crops, adds text with styles, resizes, has layers capability, and can add some effects. You might have to install a couple to get all the features you want.Creating ImageButton Banner
For mobile apps, on cell phones(smartphones), you want the banner small; ideally, not more than 60-80px for height, and 350-460 for its' width. For this tutorial, the 'hot_deals' image is 460w x 80h. Make the image the size of the banner you want; then add it to an ImageButton element in your layout screen; and add the html link url to the executable code in java class.Test Your Banner
First, run your app to view your banner, and make sure it looks ok. You can tweak it by trying the other 'android:ScaleTypes', however keeping your image width around 400px, and height around 60-80, should scale fine for a cell phone screen with using the 'centerCrop' value.
For larger screens like tablets, you probably want bigger images that scale properly or add different size images to the other 'android-hdpi' folders.
Run your app code to add the banner to our app view. Then, once your banner is good, test your advert smartlink, by clicking on the banner, making sure the screen that displays loads properly for the smartphone screen size. Do not click on any link at that point; just view it to see that it is compatible with your device screen size. To return to your previous page, just click your back button on your phone.
For smartlinks, you can use a simple text link on your websites with your own wording; and you can make banners as well, and add those to the smartlink html code. This is easy to do.
Several of the established Ad Networks, meaning they have been promoting advertising for years, offer a vareity of ad types and styles, including: native, intertitstials, popups, popunders, push notifications, banners, and of course Smartlinks that are cross platform for websites and mobile apps.
Their ad creatives are easy to create and implement; and like most ad networks they have stats on your traffic and a detailed report for sales and the like. Most ad networks pay biweekly, monthly, and some weekly for a small fee.
Button to Weblink - ImageButton to Weblink: Smartlinks
This tutorial, 'imagebutton to weblink', and our previous tutorial 'button to weblink', provide code with examples you can use to implement your own smartlinks in your mobile apps. These code examples can be implemented in your apps for a variety of purposes for apps you want to develop.
Dependencies and SDK Version Targets
For this app we are using the 'uri.parse' method in our java class code(MainActivity.java), which was introduced in earlier versions of the Android Platform, therefore we do not have to add any dependency code for this. As you know, any required dependency code is added to our 'buildgradle' file.Our SDK versions should reflect the newer versions of Android, that way we can target as many users as we can. For this app we use 16 for the min SDK version, and 28 - 31, for our target Sdk version. You can also change these in the 'buildgradle' file of our app.
We are going to create a new app for this tutorial, and name is - ImageButton To WebLink(Smartlink)
App Screenshot

Creating Our New App
Open AIDE, Select New Project, from the left menu, or center menu hierachy of files; and do the following:
Select

choose NEW ANDROID APP(Gradle/Android SDK/java/xml) if your using the newest version of AIDE.
Choose HELLO WORLD example app template(java/xml);if your using an older version of AIDE,
For app name; type 'ImageButtonToWebLink'
For app package name type: com.aac.imagebuttonsmartlink
Click Create
Your new app is now created for you - named 'ImageButtontoSmartlink'. For now, you will have the 'little green Android image' as your app icon.
This app has a customized app icon; you can download it at the Example Code section.
Once you add your apps' icon image and run your app with the updated and any new pages you create; you'll see the customized 'App Icon' instead of little green Android icon.
Note: Not all tutorials have a customized icon or require new pages to be created.
AIDE automatically opens your new app in the editor for you.
Where Code is Coded
ImageButton
The image button element is added at our layout, at main.xml. We have to add the 'ImageButton" element; then we add the image we want to have in the button using the '@drawable/ attribute. The image itself is added to the res/drawable folder at res in our app project. You must create this folder res/drawable. Once you create it, add the image, 'hot_deals'.
Because we want our image button to be used as a banner, we want to place it at the top of the view.
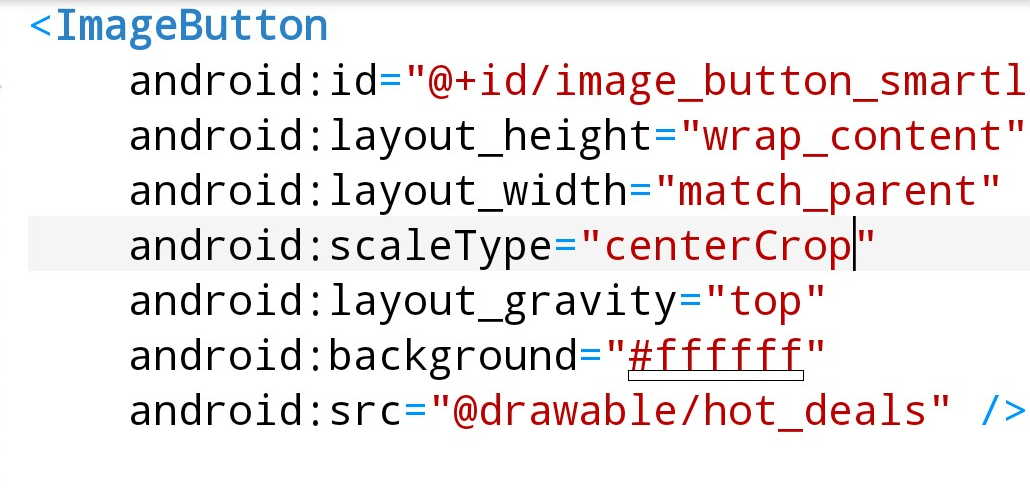
To code this we use the 'android:layout_gravity="top", property. We also add the width and height properties as shown in this image. We use 'match' for width because we want the image to scale across the entire screen. And 'wrap' for height because we want it to be only the height of a default button height. To keep it centered properly, we add the 'android:scaleType="centerCrop".
You could also use the value 'fitCenter' for this, however it is best to try each one to see what looks better for the text in your image. 'FitCenter' will most likely keep the text of the image more towards the center, while using CenterCrop will let it stay centered but off to the side more. If your image did not have any text, perhaps either one would work fine.

Look at this image shown. It has space around the banner image. This space around the image is not so appealing. We can add a white background to our view which will blend out this space around the image button. By using the background color as white, we can make the views' appearance blend together and look nicer.
Layout and Java Class Pages
For our ImageButton To SmartLink, app, we must edit our 'main.xml', and the 'MainActivity.java'. Since these are already created we just edit them by copy and paste to update the code.
And, we must add our icon name to our AndroidManifest.xml page, as we are adding our own customized app icon. At at strings.xml, we can delete any additional strings that are there, we just require the 'app name' string.
Just copy paste the code from Example Code section for code for main.xml and MainActivity.java, and Save each page.
And, we must also add the 'app photo shot' image to our drawable-hdpi folder at res/. You can download the image from our Example code section. This is the image that displays as your app icon on your phone when your download and install the app.
Making the App Icon Image
You will now have the apps' icon as a screenshot of the app itself. This is easy to do. I just took a screenshot of the app screen, and then cropped it somewhat, then added to the 'res/drawable-hdpi' folder of the app project. As mentioned, because I am using this image as the apps' icon, it must be added to the 'AndroidManifest.xml' file, at 'android:icon' in the code. Just replace the text 'ic_launcher', with the icon image name: hot_deal_app_shot.png .However, you don't need to add the .png to the name. You can download this image at the Example Code Section on this page.
Also at our manifest, we must add the 'uses permission' property. This is required in any app where you add an executable url link either with xml code such as 'autolink', or by adding it in java class as we are doing for this app. The code is at the Example Code section for AndroidManifest.xml; just copy and paste to replace code on page now.
Main.xml
At main.xml, the layout file, we add the 'LinearLayout' for the view, then we add the code for the 'imagebutton' by using the element 'ImageButton'.For our MainActivity.java code, we must add the code for our button and connect it to the id of the image button element at main.xml: 'r.id.image_button_smartlink'.

Then we can add the 'onclicklistener' to it so when someone clicks on the image banner they goto the link shown in the 'uri.parse' code class. As mentioned, this link can be changed whenever you like, and the link must be enclosed in the "" as shown.

Import Statements Added
You must add the 'import statements' for the coding methods we are using at the MainActivity.java page. If you look at the code in the MainActivity.java class file, you'll see many imports have been added. If you do not add these, or don't add the proper ones, you will get build errors when you try to run your app code.Looking at this next image of imports for this apps' code; you can see that for the 'uri.parse' class code, we added the required import - 'import android.net.Uri'; and for the 'onClickListener' method, we added the required import - 'import android.view.View.onClickListener'. And, since we are using the ImageButton widget, we must add an import for that also.
Usually some word in the name of the import gives a clue to what code class it represents.

Unfortunately, the import codes are not always included with codes you find online to try; so you must research to get them. You can make yourself a 'import statements' list, so as you code you'll become familiar with them, and have easy access to the more common ones your likely to use often.
View Import Statement Examples by Code Class
RUN your APP
Once you edit the pages, main.xml, and MainActivity.java, AndroidManifest.xml, and add the images to the res/drawable-hdpi folder, and drawable folder(has to be created at res/drawable), and strings.xml(removed helloworld string), you can Run and build your app to view the changes.
All code for this tutorial is at the Example Code section on this page. Only copy and replace code for the pages mentioned that require updating.
At Example Code section on this page; any page notated as 'no edit required or view only', means you dont have to copy and paste that page - added only for you to view.
TIPS
Navigating The App Project Hierachy
To view A FILE do either: from right menu choose FILES or GOTO, this will show the apps files along the top of editor, dropdown, and left side menu. After editing a file, SAVE it, right side menu, choose SAVE.Creating Pages
Check for the filename extensions of page your creating. If for example, your creating a new Java page, (java folder)you want to see pages already created in that folder that have the .java file extension. Click 'create new java class' to create your page.
For xml files, you must create these in the 'res/layout' folder of your app project. Click 'add new xml file', to create your page.
Additional Reading on coding 'uri Parse', at Android Developer website
Uri Parse - Android Developer
In Summary,
App Name is 'ImageButton To WebLink' - located at AppProjects/ in AIDE; OPEN the AIDE app, then open App Projects, THEN select the 'ImageButton To WebLink', app from your files hierachy(left menu); then DOUBLE CLICK on any file from the app, like strings.xml, to open it in AIDE.
Make sure at top of page, the app name 'ImageButton To WebLink' is there next to AppProjects like so: AppProjects/ImageButtonToWebLink, then you know you have the proper App.
Once a file is in the editor, you can edit, save it, then RUN your APP, install, to Open your app.
You can open the app Simply by Clicking on the Android little green App Icon,with the wording 'ImageButton To WebLink' on your tablet. It will be with your other installed apps.
If you make further changes to this App, you need to SAVE, RUN, UPDATE, INSTALL, OPEN the app again.
EXAMPLE CODE - Code For This Tutorial.
JUST copy the code for this tutorial from the Example Code in this section.

JUST copy the code for this tutorial from the Example Code in this section.
This free script provided by
JavaScript
Kit
AIDE for creating Android Apps on your tablet or cell phone(android).
Free and Paid.
GoTo Aide
ANDROID STUDIO - for creating Android Apps on your desktop computer.
Free to Install and Use
Learn more - Android Studio
The Java XML files we code(example codes) and the Android Apps we create in our Free Tutorials are compatible with Android Studio and AIDE. Just choose Java XML as your Programming Language.
You May Like:
Golf with Lefties - Golf Instruction Tips & Videos Taste World Wines Flavours and Aromas
Android Tutorial: Image Button To WebLink - Smartlink Banner
AndroidAppCoding.com, All Rights Reserved