Libgdx with Android For Game Dev
Game Dev Tutorial : Creating a Text Label
Game Dev -All Game Dev Tutorials
Click Create. Now TextLabelStage app is created, and the MyGdxGame.java page opens in your AIDE coding editor.
App Shot - Text Label Stage
Screen Size 5.8" smartphone

Landscape orientation


After imports, we add the game 'public class code', MyGdxGame implements ApplicationListener', and then add/declare our game variables as shown in this next image. We create a name for each of them, their variable. So for 'Orthographic Camera' its' variable name is 'camera', and for 'ExtendViewport', its' variable name is 'viewport'. Stage we named as stage, and Spritebatch, we named as batch.
You can name the variables as you like. Example; you might name BitMapFont as myFont; or Spritebatch as myBatch.
To Note: when naming your variables, if they include more than one word, you must camel case them. So myfont becomes myFont; and mybatch becomes myBatch.
Any calls(code) we include in our game code, must be declared here as a variable unless they are included in another call, or they are included by default in Libgdx. So, Stage, Spitebatch, BitmapFont, ExtendViewport, OrthographicCamera are all required. Label, and Actor don't have to be declared here, because they are included in Stage, and Stage has been declared.
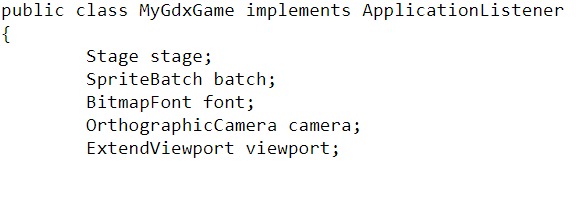
When adding code for a game, the best practice is to include the 'OrthographicCamera', and a 'Viewport', especially if you are using a 'Stage'. With these included, your game assets will render more accurately across different device screen sizes.
The next thing we code is our Viewport and OrthographicCamera. We 'Create' new instances of them in the Create method. And, at this code code,
camera.position.set(camera.viewportWidth / 2, camera.viewportHeight / 2,0);
we are telling Libgdx to position the camera to the center of the viewport, which is essentially the center of the game screen.
Next, we create our new Viewport. You can use any viewport type you want; ExtendViewport works well in this scenario. So we add the code as this: stage = new Stage(new ExtendViewport(1200,800));. This tells the stage to add a new viewport, and to set the resolution of the viewport at 1200 for width and 800 for height.
The viewport can be set with different resolutions; each will render your viewport aspect differently. So, 800,600, or 600,480, will render differently. It depends on what you want to achieve, and of course if you want to target Portrait, and Landscape orientation, or just one of them.
Also looking at this next image, you see a ScreenViewport()(notated) for you to see the code. ScreenViewport does not require any additional arguments like ExtendViewport does. You don't have to include the 1200,800 resolution. This type of viewport is best suited to a smaller game screen like a small cell phone size, where aspect ratio is not a consideration. For resizing of your game screen: example: resizing to and from portrait and landscape on a device or different device screen sizes; the ExtendViewport is a better choice. There are a couple of ways you can code the ExtendViewport. For this tutorial, we have coded the 'ExtendViewport' by setting the resolution, at 1200,800.

After including new instances for the camera, and viewport, we can begin to code our BitMapFont for the Label we are creating. First, we must create an instance of the font, by using this code
font = new BitmapFont();. Here we used the word 'font' as our variable for the BitmapFont, however, you can name it as you like. Just declare it first at variables, then use that same name here. In this case, we declared it as 'font', and then used it here as 'font'.
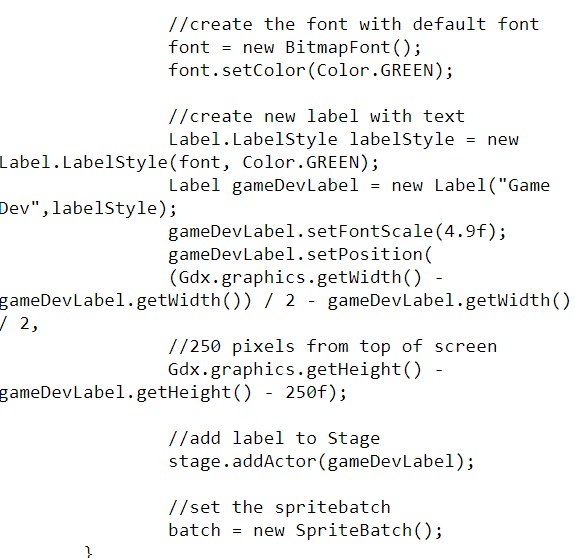
Our LabelStyle, and Label are coded next. For the labelstyle, we use this code:
Label.LabelStyle labelStyle = new Label.LabelStyle(font, Color.GREEN),
Note, we add the color here also, that being green.
After label style we create our 'Label' with this code:,
Label gameDevLabel = new Label("Game Dev",labelStyle);
Important here is the variable name we create for the Label call; 'gameDevLabel' is our variable name for the Label. So now we use that name to set the size of our label(setFontScale), and to position our label, using this code:
gameDevLabel.setFontScale(4.9f);
gameDevLabel.setPosition(
(Gdx.graphics.getWidth() - gameDevLabel.getWidth()) / 2 - gameDevLabel.getWidth() / 2,
//250 pixels from top of screen
Gdx.graphics.getHeight() - gameDevLabel.getHeight() - 250f);
And, we set the height for the label also. -250f means the height from the top of the game screen. So, for width, we have centered it, and for height, we want it 250 units from top of the game screen.
Then, we add the 'gameDevLabel' to the Actor, and the Actor gets added to the Stage with this code:
stage.addActor(gameDevLabel);
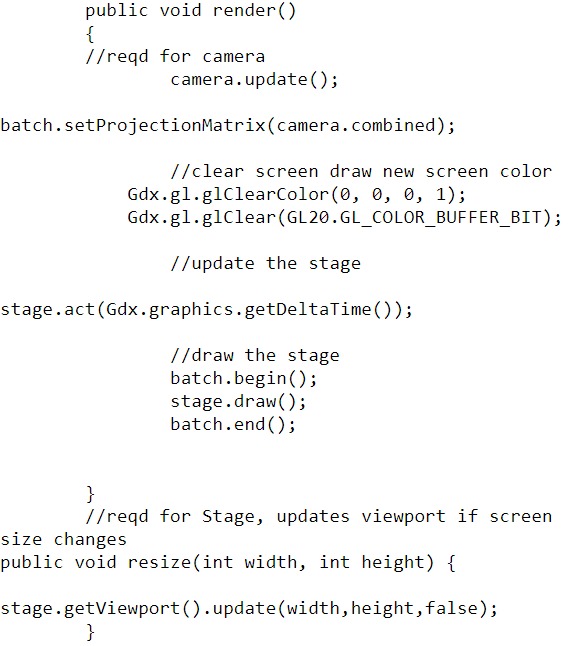
At the Render method, we add the code for the camera. We must include the 'camera update', and the 'setProjectionMatrix' calls. Then we add the code to clear the screen and add new screen color. Next, we include this code:
stage.act(Gdx.graphics.getDeltaTime());
This code updates our stage, before we draw the stage. DeltaTime is for getting the time proper for your screen assets and the like. After this call, we can then draw our stage with this code:
batch.begin();
stage.draw();
batch.end();
And, then we include our 'resize' call, to the viewport so it updates if there are any changes in the screen size. The code for that is:
public void resize(int width, int height) { stage.getViewport().update(width,height,false);. Here 'false', keeps aspect ratio for both portrait and landscape mode, setting true, does not. Aspect ratio refers to proper sizing of an image(not squished or distorted). To check this; look at your app in portrait mode, then turn your smartphone and look at it in landscape mode. With this value set to 'false', the text label shows proper in portrait and 'landscape' modes, but when set to 'true' it shows only proper in portrait mode and for landscape(does not display properly or does not show at all on screen). Note: This is based on our camera and viewport settings for this particular app. For different viewport and camera settings, this value set as 'true' might be more practical.
Lastly, we include our code for the 'dispose method'. Here we must dispose of our assets and the stage with this code:
stage.dispose();
batch.dispose();
font.dispose();
We also include the Resume, and Pause methods, in this code, as this:
@Override
public void pause()
{
}
@Override
public void resume()
{
}
To Note: These calls pause,resume; are required, as are public void dispose, and public void resize. These four calls must be included because we are using the 'implements ApplicationListener' game class for our game screen. If you don't include all of them or omit any one of them, you will get a RUN time error when building your app code telling you the 'ApplicationListener' class requires these four calls be included.
And, when using the 'ApplicationAdapter' game class, these four method calls are NOT required. Also, the 'resize' call can be included at the 'public void dispose' method call, or it can be added in code at the 'render method, as we have done with this app.

For the label, we added a Label style, with a green color, and positioned it to center of the game screen using the getWidth, getHeight parameters.
We used the 'ApplicationListener' class for our game screen in this tutorial, however, you can also use 'ApplicationAdapter' class, as we have used in several of our game tutorials. With 'implements ApplicationListener' game class, we must include the Pause, Resume, Resize, and Dispose method calls. With either class you should include the Resize and Dispose methods, as removing game assets with dispose can make your game performance better, and resize method ensures your game is resized properly across different device screen sizes.
With Libgdx, ApplicationListener, and ApplicationAdapter are two of the commonly used game classes. Another class for game play is 'Screen' class. We shall learn more about these game classes as we continue our tutorials.
Game Dev -All Game Dev Tutorials
App Project Name: Text Label Stage
Using 'Stage' and 'Actor' of Scene2d, we can create a 'Text Label', and add any text we want to it. For this tutorial, we are going to create a 'Text Label', with the text 'Game Dev', and add it to our game screen. To do so, we require a font. We will use the Libgdx default font for this. We'll give our font(BitMapFont) a size and color; add it to our label, and then declare the text label as the Actor, so we can add it(Actor) to our Stage. All code for this tutorial, is at the Example Code section on this page. There is no image for this tutorial.Create our Game App Screen
We are creating a new app for this tutorial. First, we must create our new mobile game app, so in AIDE, at the AppProject file hierachy, Choose Create New Project, select Mobile Game, and New Mobile Game; then add the App name, TextLabelStage(Note: no spaces in the app name(can use _ ), or you can add spaces after you create it; Just Goto: the 'AppProject' folder; just select the App Name, and then select rename). Next, add the package name, 'com.aac.text_label_example'.Click Create. Now TextLabelStage app is created, and the MyGdxGame.java page opens in your AIDE coding editor.
App Shot - Text Label Stage
Screen Size 5.8" smartphone
Landscape orientation
Code For This Tutorial
First, for code, we must add the required import statements as shown in this next image. Required are imports for each method we add like camera, viewport, font, color, label, stage, and spritebatch. Also note that Stage, and Label are from the Scene2d class as declared by their import.
After imports, we add the game 'public class code', MyGdxGame implements ApplicationListener', and then add/declare our game variables as shown in this next image. We create a name for each of them, their variable. So for 'Orthographic Camera' its' variable name is 'camera', and for 'ExtendViewport', its' variable name is 'viewport'. Stage we named as stage, and Spritebatch, we named as batch.
You can name the variables as you like. Example; you might name BitMapFont as myFont; or Spritebatch as myBatch.
To Note: when naming your variables, if they include more than one word, you must camel case them. So myfont becomes myFont; and mybatch becomes myBatch.
Any calls(code) we include in our game code, must be declared here as a variable unless they are included in another call, or they are included by default in Libgdx. So, Stage, Spitebatch, BitmapFont, ExtendViewport, OrthographicCamera are all required. Label, and Actor don't have to be declared here, because they are included in Stage, and Stage has been declared.
When adding code for a game, the best practice is to include the 'OrthographicCamera', and a 'Viewport', especially if you are using a 'Stage'. With these included, your game assets will render more accurately across different device screen sizes.
The next thing we code is our Viewport and OrthographicCamera. We 'Create' new instances of them in the Create method. And, at this code code,
camera.position.set(camera.viewportWidth / 2, camera.viewportHeight / 2,0);
we are telling Libgdx to position the camera to the center of the viewport, which is essentially the center of the game screen.
Next, we create our new Viewport. You can use any viewport type you want; ExtendViewport works well in this scenario. So we add the code as this: stage = new Stage(new ExtendViewport(1200,800));. This tells the stage to add a new viewport, and to set the resolution of the viewport at 1200 for width and 800 for height.
The viewport can be set with different resolutions; each will render your viewport aspect differently. So, 800,600, or 600,480, will render differently. It depends on what you want to achieve, and of course if you want to target Portrait, and Landscape orientation, or just one of them.
Also looking at this next image, you see a ScreenViewport()(notated) for you to see the code. ScreenViewport does not require any additional arguments like ExtendViewport does. You don't have to include the 1200,800 resolution. This type of viewport is best suited to a smaller game screen like a small cell phone size, where aspect ratio is not a consideration. For resizing of your game screen: example: resizing to and from portrait and landscape on a device or different device screen sizes; the ExtendViewport is a better choice. There are a couple of ways you can code the ExtendViewport. For this tutorial, we have coded the 'ExtendViewport' by setting the resolution, at 1200,800.
After including new instances for the camera, and viewport, we can begin to code our BitMapFont for the Label we are creating. First, we must create an instance of the font, by using this code
font = new BitmapFont();. Here we used the word 'font' as our variable for the BitmapFont, however, you can name it as you like. Just declare it first at variables, then use that same name here. In this case, we declared it as 'font', and then used it here as 'font'.
Our LabelStyle, and Label are coded next. For the labelstyle, we use this code:
Label.LabelStyle labelStyle = new Label.LabelStyle(font, Color.GREEN),
Note, we add the color here also, that being green.
After label style we create our 'Label' with this code:,
Label gameDevLabel = new Label("Game Dev",labelStyle);
Important here is the variable name we create for the Label call; 'gameDevLabel' is our variable name for the Label. So now we use that name to set the size of our label(setFontScale), and to position our label, using this code:
gameDevLabel.setFontScale(4.9f);
gameDevLabel.setPosition(
(Gdx.graphics.getWidth() - gameDevLabel.getWidth()) / 2 - gameDevLabel.getWidth() / 2,
//250 pixels from top of screen
Gdx.graphics.getHeight() - gameDevLabel.getHeight() - 250f);
And, we set the height for the label also. -250f means the height from the top of the game screen. So, for width, we have centered it, and for height, we want it 250 units from top of the game screen.
Then, we add the 'gameDevLabel' to the Actor, and the Actor gets added to the Stage with this code:
stage.addActor(gameDevLabel);
At the Render method, we add the code for the camera. We must include the 'camera update', and the 'setProjectionMatrix' calls. Then we add the code to clear the screen and add new screen color. Next, we include this code:
stage.act(Gdx.graphics.getDeltaTime());
This code updates our stage, before we draw the stage. DeltaTime is for getting the time proper for your screen assets and the like. After this call, we can then draw our stage with this code:
batch.begin();
stage.draw();
batch.end();
And, then we include our 'resize' call, to the viewport so it updates if there are any changes in the screen size. The code for that is:
public void resize(int width, int height) { stage.getViewport().update(width,height,false);. Here 'false', keeps aspect ratio for both portrait and landscape mode, setting true, does not. Aspect ratio refers to proper sizing of an image(not squished or distorted). To check this; look at your app in portrait mode, then turn your smartphone and look at it in landscape mode. With this value set to 'false', the text label shows proper in portrait and 'landscape' modes, but when set to 'true' it shows only proper in portrait mode and for landscape(does not display properly or does not show at all on screen). Note: This is based on our camera and viewport settings for this particular app. For different viewport and camera settings, this value set as 'true' might be more practical.
Lastly, we include our code for the 'dispose method'. Here we must dispose of our assets and the stage with this code:
stage.dispose();
batch.dispose();
font.dispose();
We also include the Resume, and Pause methods, in this code, as this:
@Override
public void pause()
{
}
@Override
public void resume()
{
}
To Note: These calls pause,resume; are required, as are public void dispose, and public void resize. These four calls must be included because we are using the 'implements ApplicationListener' game class for our game screen. If you don't include all of them or omit any one of them, you will get a RUN time error when building your app code telling you the 'ApplicationListener' class requires these four calls be included.
And, when using the 'ApplicationAdapter' game class, these four method calls are NOT required. Also, the 'resize' call can be included at the 'public void dispose' method call, or it can be added in code at the 'render method, as we have done with this app.
Summary
With this tutorial, we learned how to add a Label with text using Actor and Stage of Scene2d. We added an ExtendViewport and Orthographic camera, and showed one way that we can set and position our viewport and camera.For the label, we added a Label style, with a green color, and positioned it to center of the game screen using the getWidth, getHeight parameters.
We used the 'ApplicationListener' class for our game screen in this tutorial, however, you can also use 'ApplicationAdapter' class, as we have used in several of our game tutorials. With 'implements ApplicationListener' game class, we must include the Pause, Resume, Resize, and Dispose method calls. With either class you should include the Resize and Dispose methods, as removing game assets with dispose can make your game performance better, and resize method ensures your game is resized properly across different device screen sizes.
With Libgdx, ApplicationListener, and ApplicationAdapter are two of the commonly used game classes. Another class for game play is 'Screen' class. We shall learn more about these game classes as we continue our tutorials.
EXAMPLE CODE - Code For This Tutorial.
JUST copy and paste to update your code.
JUST copy and paste to update your code.