Libgdx with Android For Game Dev
Game Dev Tutorial: Intro to Game Sprites
Game Dev -All Game Dev Tutorials
For this tutorial, we are going to learn about 'sprites', and, we are going to add a 'cat pixelart' sprite character, and add some fixed animation to it. In previous tutorials, we learned about the 'Texture' code call, and how we can use it to load our game assets, like images. Once loaded, our game asset can be declared as an Image, or an ImageButton, and either of these can be actioned. One way to action our game characters is using Actor with Stage of Scene2d.
Sprites are also game assets. Sprites are unique because they are mostly made from pixelart. They can also take on a fixed action by adding - scale, and, rotation. They cannot execute 'real time' action of themselves. However, by adding them as Actor and with Stage; then, they can get created during a game, and be deleted during a game; like a spacecraft, being blown up in space. Adding actions to them is easy with Actor and Stage of Scene2d while implementing the MoveToAction method, which has lots of actionable real time functions.
Sprites are commonly used for game objects, common ones can include: Characters(game's main character, a hero, an animal); Game Enemy(zombies, flying saucer); Game Collectibles(items a player collects to gain points or power-ups- coins and gems); Shoot and Throw - game objects(bullets, arrows, fireballs); Environment Elements(moving platforms,falling rocks,spikes); Background Elements(static or animated - trees, clouds, city buildings); Game Effects, visual or audio to enhance game(explosions, particle effects, magical auras); Interactive Objects that trigger actions (buttons,levers,switches); and, NPCs- non player characters(shopkeeper, friendly animals, guests).
A sprite is typically declared from the 'Texture' code call, which as we've learned already, is just a way to load our game asset, like an image.
In this tutorial, we will load the game pixelart image - pixel-cat.png, with the 'texture' code call, and then declare that texture as the 'sprite', give it some non-action animation, and then draw it to the game screen with batch.
We'll also learn additional sprite features: like what game types they are mostly used with, and how you can create your own sprites with pixelart creation tools.
Code for this tutorial is at the Example Code section on this page. Just replace the code at 'MyGdxGame.java', with the code from the Example Code section; also, and save the image, 'pixel-cat.png', and add it to the 'assets' folder in your AppProject for this tutorial.
FYI: The code from this game dev tutorial is compatible with Android Studio with the Libgdx component. Read more about Android Studio and Libgdx Here
Most all your game coding is done on the MyGdxGame.java file for each new game app you create(with AIDE coding editor).
For more info on navigating files and using the AIDE coding editor, goto Tutorial 1.
App Shot
App Project: Game Sprites
To edit our code for this tutorial, we first must update our import statements so we add them as shown in this next image. As we are adding a sprite and texture, we must include imports for both. And, the import for 'Application Adapter' class, and for 'spritebatch' as they are equally important, with the spritebatch drawing our image/sprite to the screen.

Next we include our game screen class, public class MyGdxGame extends ApplicationAdapter
and then add/declare our game variables(from the class members), as shown in this next image. We include one for the 'Texture - we name it texture, 'Sprite -we name it sprite, and 'Spritebatch - we name it batch'. Note: You can name the variables for the these class members as you like.
Then, at the Create method, we create the instances of our class members, functions, and methods we intend to use. To create our Sprite - sprite we pass the texture image to it with the code: sprite = new Sprite(texture);. So, we first create our texture as we would, then simply declare that texture as our sprite with that code.
In the create method, we also set the position for our sprite, and, its' 'scale', and 'rotation' values, as seen in the code in this image(and code at Example Code Section).

Lastly in our code, we use the 'draw' method to draw our sprite to the game screen. Important here is that we use 'sprite.draw(batch), and not 'batch.draw'. If we were to use batch draw then parameters we wanted to include - position,scale,rotate, would be ignored.
So, when drawing your sprites do include sprite.draw(batch);
in your draw method
batch.begin();
sprite.draw(batch);
batch.end();
The SpriteBatch class is ideal for rendering multiple sprites efficiently. It collects geometry (vertices) for all the sprites you want to draw and submits them to the GPU in batches.
If however, you want to create a game with more complexity or interaction, you can incorporate 'Stage', with actors.
Sprites are known as game objects, and can be created from an image, a rendered shape, or, pixelart.
updated April 2026
When creating your pixelart, export your files as a .png for static images, or as a .gif for animations.
The essence of pixelart is the small size you work with to create your graphic; common is to work a width and height of 32x32. A pixelart character creation with a 32x32 size, will take much less time to complete than one sized 256x256. The good news is that you can resize your 32x32 to 256x256, after you have completed it, while saving it; in fact, some pixelart makers like Pixel Studio will recommend SAVE sizes for you. With the larger saved size, you'll have more character size choices in your game scene - 32x32, 64x64,128x128, 256x256. Keeping with the power of two is also recommended, as these work best when packing your pixelart characters(sprites) to a spritesheet, if you decide to do so.
The canvas, is where you create your masterpiece.
The canvas is where you draw your characters' outline, either with free hand, or use some shapes to get you going.
Colors
Select a color from top preselected colors row, or select the color palette(from bottom bars menu squares),and select any color you want. Then just tap into the canvas and your color appears in one little square. Keep tapping to keep adding color. You can also save your selected color, just tap to save, then select a top menu square at preset colors row,to save it. You can save to any color square, not just an empty one.
That is the simplest way to get started with pixelart creation with Pixel Studio. You are drawing free hand.
In addition to tapping in a square to color with PEN tool, you can also use the 'brush' tool, from bottom rows menu; it covers more area at once than a pen.
Note: To Save your work and quit the app, just select the 3line(colored) icon,(at right side just above the bottom rows), and select Save and Quit.When you reopen the Pixel Studio app, it goes to the canvas and your last creation is shown. You can continue working on that character, or to start a new character, select 'Create New', also at 3line, colored icon.
Shapes
If you prefer, you can also add shapes first to the canvas, and then just fill in the shapes, with the colors you want. Since most pixelart characters, have a dark border around them, recommended is black. So select black color for your free hand outline, or before drawing shapes.
Our First Pixelart Character
This next image is a shot of the pixel studio canvas, with three shapes drawn into it. A circle, square, and a line. Using these 3 shapes, we have drawn an outline of a simple game character. The line, is drawn for arms and legs, the square, for body, and the circle shape is for the character's head.
You can view/select the shapes; from menu bar row - squares, across the bottom of the editor, Select the Shapes square.
Once you click into shapes(is selected in the example image shown here, with shape line selected -, look just below the canvas to see all 6 shapes available), all 6 shapes appear topside. Just select the shape you want from the 6, then tap the menu bar's shape square selection box again.
Next, tap the canvas where you want to start the shape; and then drag to draw out the shape you've selected, and its' size.
When done with drawing shapes, to unselect shapes, just tap into the shapes square again(at bottom menu row), then, just select the PEN box and select your pen size(at setting can change), default is 1, which is fine to outline, and draw your shapes.
Now that you have your character's outline drawn, you can use the PEN to start drawing in your colors. The PEN is next to the color palette, on the bottom rows menu selections.

Contrast Colors
It is the contrasting of same colors that facilitates the pixelart look, and gives texture, and better detail to the image. You can do this yourself by selecting a lighter or darker color of the color you want to contrast. Just tap to add the contrast color to individual litte squares. Usually you add contrast color to corners, edges, and to create the sense of light, shadow. The dither can do this also, it is at the bottom rows menu also. Once dither tool is selected, just tap into a color, and it adds either a lighter or darker color.

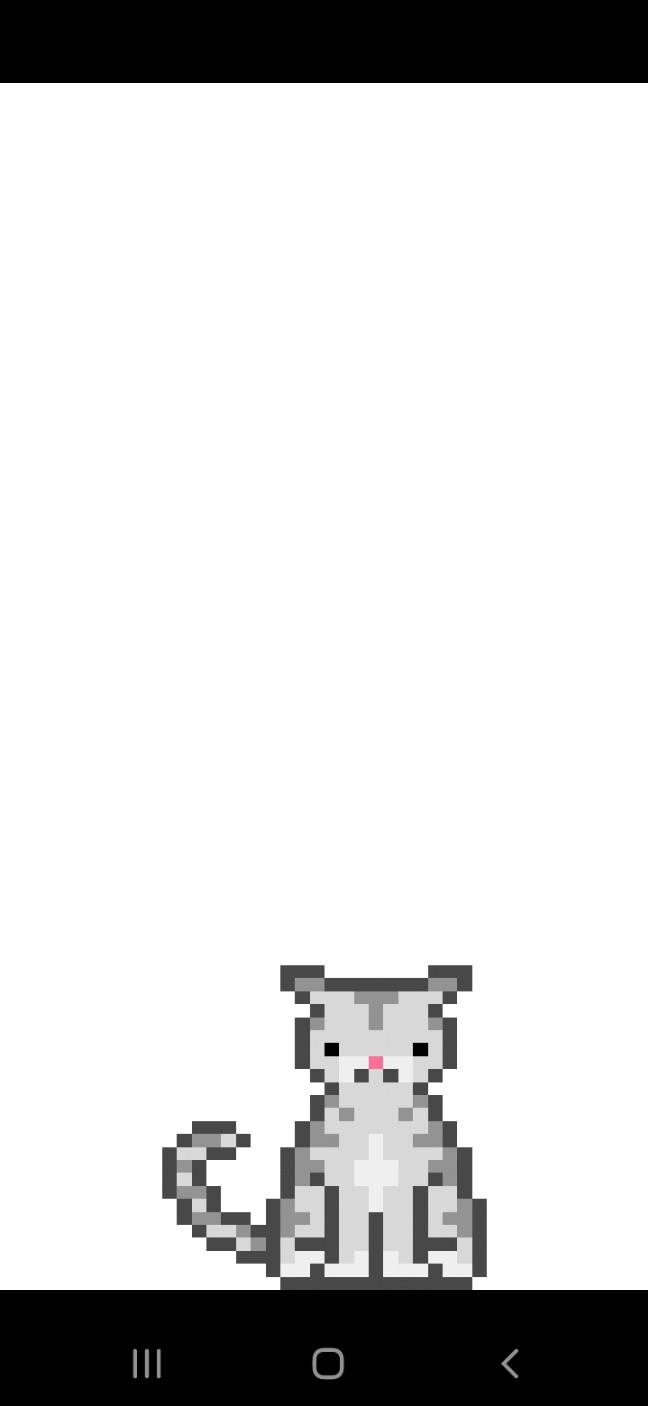
This is the pixelart cat character used in this tutorial. You can see the dark outline around the entire image, and then color and contrasting color is added to draw the cat details. Since the overall cat body color is light grey, our contrasting color is a darker grey, and also added some white color to define specific areas, like the cat's feet, and whiskers.
I found this pixelart character on the web, free to use.
The Free Pixelart Creation App and Website - Pixel Studio-mobile app, and Pixilart - website for desktop creation, allow for Tracing of images. Basically, you load the image you want to trace, and then use the pen/pencil tool to trace around the image, making sure to add a New Layer, typically Layer #2, for your pixelart creation. Once you've added all the colors, and your done, you can delete the background layer(1st layer). Important is that you remember to Add a New Layer, before you start your outline of the image, and that you have the New Layer selected. So, typically Layer#2 is your working layer, Layer#1 is the original image your tracing. Add new Layer, and click to use that layer, layer#2. Once trace is done, delete the Layer#1, and Layer#2, becomes Layer#1. Now just save your image, SAVE AS, as a png. Select size 256x256, that way, you can make smaller sizes of it.
Screenshots of 'Pixel Studio' Mobile App

With Pixel Studio: first SELECT Create New, Open>>3Dots>>[From Files] - select - Add Image, if you are loading your image for Tracing. To trace a premade pixelart image, you load the image as the background for first layer(loaded image automatically goes to first layer), and then you can use opacity for the transparency(at tools icon) you want.
Opacity
You lower the transparency(opacity) on the 1st layer(the loaded image) because that makes it easier to see the colors you are adding while you trace over the image on the second layer. Next, click into the layer next to the background(the Image loaded) layer. This is your Layer#2 - the layer you want to keep active shown in this next screenshot.

Adding Layers
You can also add additional Layers by selecting the "+" icon, at Layers. Then select Pen icon, and pen width(at settings icon for this).
Before you begin, check layers, the active current layer has a colored yellow solid block around it, as seen at Screenshot; this indicates it is the layer you are now working on - active or working Layer.
Next, start outlining the image using the PEN, with your finger on the screen, edge around image with a dark color like black(common for outlining), select black color from top of screen, at color squares, or select color from palette bottom of screen, and select new color.
Choose 'select' to use a color, and SAVE, to add it to top screen color squares, but first tap a square with + icon, to save the selected color, or save it to a preselected color slot(replaces the color there now).
To color your image's squares, first tap to select a color, or tap the color palette and select a new color. You don't have to save a new color in order to use it.
Color - trace your image: Tracing or not, you follow the same color process, just tap each little square to add the color. You can change the pen size, if you need to color a large area.
Undo Arrow
Any mistakes, just click undo arrow, then tap a square to color again.
Then just redo that area again. You don't want to draw one continuous line around the entire image, because if you make a mistake, you'll have to re outline the entire line. So, short lines are best, especially for outlining the image. A pen size of 1 is common for outlining your image in black.
Tracing Image:
Set the Pen width/size with a toggle bar.

To Outline The Image
Set PEN width to 1, 2, is common; but depends on the image, especially if Tracing it. For this next screenshot you can see the Blue Chiibi warrior I loaded into the editor.
I did not use 'Create New', to upload my image, instead I selected 'OPEN', and 'Open' >>From files, then selected my image from the images on my phone. Now I can trace the image.
If I were to use 'Create New', I have to select a pixelart small size like 32x32, and then if I load the image afterwards, it just looks overly distorted because its much larger than the 32x32 size I want to create.
However, if we want to create a new character(no tracing), we select >> Create New , select size 32x32, and prefereed options.
Mini Map
Also note the mini map, a smaller version of the chiibi warrior on the editor screen - this you can toggle on or off from settings. This is good because it lets you see the actual layer your working on, so you see if your colors are where you want them, and, that you added enough color. The 'mini map' is especially useful when tracing an image.
First draw complete outline around the image your tracing. Then start your color and contrasting colors. Once you complete all the outlines and the image is completely colored- the second layer, (your creation), just delete the first layer before saving the image.

Save Your Pixelart
To Save the image; select '3lined color icon' right side menu; SELECT Save, and save to File(or photos)and, save it as type png(recommended) - example: myart.png. You can also Resize the Image before saving it; 1x,2x,3x,4x,- the original image size; and might see a 'resize to avoid BLUR' recommendation also; just select 2x, to see if the 'avoid blur message' changes to Resize, if so, all good at that resize you selected. Usually selecting 256x256 is good for this.
Merging Layers
Note: Make sure you are at Layer#2, before saving(if you Traced an Image); usually you delete Layer#1,the image you traced, then your traced layer will become Layer#1. From there you can add additional layers if you want. For example, you decide to add a weapon to your warrior, but you don't want to add it to the first layer.
You create a second layer, add your weapon, then flatten both layers, merge the layers, 1 and 2, and, THEN SAVE, the image, with SAVE AS, To check your on proper layer, look for SOLID line color around square of current Layer; this indicates its' the layer your working on, and Layer # number shows atop the layers. To 'merge layers', first, select, Merge Icon,(3 layers icon), at bottom rows menu;(this populates Tool icon); then select, 'Tool icon', at right of bottom rows, then select 'Merge all Layers'; now save your image, with SAVE AS.
Note: Before a Layer gets deleted in Pixel Studio, you will see a dialog, asking 'Is This The Layer You Want to Delete'. and,
Before Layers are merged, you will see a dialog, asking, 'Do you Want to Merge all Layers'.
To Save your work and exit Pixel Studio app
Just select at settings - icon -3lined color icon; and select the SAVE & QUIT.
To reopen Saved work, just tap the '3line color icon'; click TABs at very top of dialog box, select the image you want to OPEN, tap the checkmark at bottom right of dialog box. Your selected image will open in the pixelart editor. Pixel Studio opens with the last image you were working on.
Alternatively, you can use the 3Line Icon, Open >> 3Dots >> From Files, to open any image from your phone, including those, you are currently working with. and, also -
Open >> click Folder, to open pixelart - already created and saved.
Pixilart - Online Website for Pixelart Creation
The online website, Pixilart, where you can create pixelart and pixelart animations, has a similar process for making pixelart .png types. First, in settings, check that 'Tracing' is ON, then once image is loaded, set a second layer,(loaded image auto goes as background, or 1st layer), again you can toggle opacity as you like. Set the image size with toggle bar. Save your image when done, png type is best for non animated creations. To Save your work, you can delete 1st layer, but with Pixilart, first layer(when tracing is on) does not get saved.
To Note: When tracing an image, the image you trace must be pixelart small size or else the image won't load proper in the editor, making it difficult to trace(assuming of course, your tracing for pixelart). Look for 32x32, is good.
There's plenty of small size pixelart characters you can find online and chiibi characters are good also, they are small and popular for mobile game dev. I found some at, OpenGameart.org - I listed their website on this page.
Free Pixelart Creators
The Pixel Studio android app is free to download and install on your device. It does have in app purchases for some things like making game 'tilemaps', however, there's lots of free features to keep you busy. With Pixilart website, it's also, free; in fact, you can start creating without joining. However, if you join (for free - email), then you can save all your pixelart creations.
You can also make pixelart animations at Pixilart website, and at Piskel website, the links listed on this page also. It is recommended to save pixelart images as .png type, and animations as .gif type.
More on creating Pixelart characters and game scenes as we continue our tutorials.
Now that you know something about creating pixelart, we will discuss the types of mobile games and windows games that can work with pixelart characters and pixelart fixed game assets, like scenes, backgrounds, and tiles.
2D GAME PERSPECTIVES
When making mobile and windows games, you can consider three types of game perspectives from which to build your 2D game interface. Those are: isometric, top-down, and side-on. Important, as each one requires that you draw your pixel art in a specific manner.
ISOMETRIC PIXEL ART
In this game perspective, all three visible sides of a cube will be the same size. In other perspectives like topdown or sideon, this is not possible. With this type, creating your pixelart takes longer than the other perspective game types.
TOP-DOWN PIXEL ART
With this type, the user looks down over the game, as though the camera were overhead. Making pixelart is less cumbersome with this type as only the head and shoulders of the characters are most visible.
SIDE-ON PIXEL ART
Known as a platformer mobile game type, this one takes a side-on perspective. These types can include lots of acrobatic challenges, and actions added to the sprites. With this type of view, the character's head, shoulder, and legs are visible, so making the pixelart would take more time, especially for the intricate animations.
All three types have been made with plenty of famous games. The one you choose depends on what you want to achieve in your game; and time you want to spend making your pixelart sprites.
WHAT SIZE OF CANVAS SHOULD YOU USE FOR PIXEL ART?
A mobile game screen is pretty small, especially on cell phones. So it's important to consider the resolution for the game you want to make, taking into account what has to be placed in the game screen area; like, sprites, scenery, dialogue boxes. Commonly, these resolutions are used for game play:
160px by 144px
240px by 160px
256px by 240px
256px by 224px
HOW MANY PIXELS SHOULD I USE FOR MY SPRITES?
The ratio of your game characters to the total game screen resolution is another consideration when making your game. For example: a ratio of 1:24 will make your characters look big on screen, while a ratio of 1:250 will make your characters look much smaller.
Best Practice:
Draw all of your game objects in a 1:1 tile in your chosen software. Mostly, this is at 8:8 or 32:32 pixels. For example, a 8x8 tile size has 64 pixels, whereas a 16x16 tile size has 256 pixels. The rule of pixelart: the more pixels, the more time you must take to make the sprite.
PIXEL ART COLOR PALETTES
It is also a good idea to limit the amount of different colours you use in making your pixelart sprite. Not more than three colors is recommended. And, it is good practice to use only one area of saturation in your game.
There are websites offering free game 'assets', including pixelart characters, and fixed assets, for your game dev. Here we list some of them with free assets you can use. And, we included mobile apps and online websites where you can make pixelart for Free. I used Pixel Studio, a mobile app pixelart creator, to make the a game character warrior which we'll use in our next few tutorials.
Free Pixel Art: Sets and Animations
OpenGameArt.org Free, No Registration Required
GameMaker: Free Asset Bundles:
Free Downloads Free, Must Join. Is Free
Get Frames From An Animated Gif
ezgif.com Free, Online, No Registration Required
Make Your Own Pixel Art For Your Game(Android)
Pixel Studio App from Hippo Free, Good Rating
Pixilart Online- Pixelart Creator and Makes Pixelart Animations,
Join For Free - to Save Your Creations
Pixilart for Mobile Free, Good Rating
Piskel Online - Pixelart Creator Makes Pixelart Animations Free, Web Based
Game Dev -All Game Dev Tutorials
For this tutorial, we are going to learn about 'sprites', and, we are going to add a 'cat pixelart' sprite character, and add some fixed animation to it. In previous tutorials, we learned about the 'Texture' code call, and how we can use it to load our game assets, like images. Once loaded, our game asset can be declared as an Image, or an ImageButton, and either of these can be actioned. One way to action our game characters is using Actor with Stage of Scene2d.
Sprites are also game assets. Sprites are unique because they are mostly made from pixelart. They can also take on a fixed action by adding - scale, and, rotation. They cannot execute 'real time' action of themselves. However, by adding them as Actor and with Stage; then, they can get created during a game, and be deleted during a game; like a spacecraft, being blown up in space. Adding actions to them is easy with Actor and Stage of Scene2d while implementing the MoveToAction method, which has lots of actionable real time functions.
Sprites are commonly used for game objects, common ones can include: Characters(game's main character, a hero, an animal); Game Enemy(zombies, flying saucer); Game Collectibles(items a player collects to gain points or power-ups- coins and gems); Shoot and Throw - game objects(bullets, arrows, fireballs); Environment Elements(moving platforms,falling rocks,spikes); Background Elements(static or animated - trees, clouds, city buildings); Game Effects, visual or audio to enhance game(explosions, particle effects, magical auras); Interactive Objects that trigger actions (buttons,levers,switches); and, NPCs- non player characters(shopkeeper, friendly animals, guests).
Sprite Size
Ideally, sprites are small in size and pixels, examples- 16x16, 32x32, 64x64. Sprites can be made from pixelart. Pixelart is a method of making game characters that are small in size so they don't use a lot of game memory making them ideal for mobile games. For example, a typical non pixelart game image character could have a size of 900kb; whereas a game image character made from pixelart is only 8kb.A sprite is typically declared from the 'Texture' code call, which as we've learned already, is just a way to load our game asset, like an image.
In this tutorial, we will load the game pixelart image - pixel-cat.png, with the 'texture' code call, and then declare that texture as the 'sprite', give it some non-action animation, and then draw it to the game screen with batch.
We'll also learn additional sprite features: like what game types they are mostly used with, and how you can create your own sprites with pixelart creation tools.
Code for this tutorial is at the Example Code section on this page. Just replace the code at 'MyGdxGame.java', with the code from the Example Code section; also, and save the image, 'pixel-cat.png', and add it to the 'assets' folder in your AppProject for this tutorial.
FYI: The code from this game dev tutorial is compatible with Android Studio with the Libgdx component. Read more about Android Studio and Libgdx Here
App Project for this tutorial is: Game Sprites
Create our Game App Screen
First, we must create our new mobile game app, so in AIDE, at the AppProject file hierachy, Choose Create New Project, select Mobile Game, and New Mobile Game; then add the App name, GameSprites(and, no spaces in the app name, you can add spaces after you create it at the app name folder; just select it and then select rename). Next, add the package name, 'com.aac.sprite_example'. Click CREATE. Now the newly created game app template opens your mygdxgame.java page in the AIDE coding editor. Save the game image, 'pixel-cat.png', to your device also, to the App Project 'assets' folder at 'gdx-game-android', in the App Project file hierachy.Most all your game coding is done on the MyGdxGame.java file for each new game app you create(with AIDE coding editor).
For more info on navigating files and using the AIDE coding editor, goto Tutorial 1.
App Shot
App Project: Game Sprites
In our first app shot of 'Game Sprites', we see the sprite pixel image added at the 30,30, position in our screen. x runs along the bottom of the screen(positions the sprite horizontally), and y along the side of the screen(positions the sprite vertically). This is the left bottom corner of our game screen. The default position is 0,0, which is right in the bottom left corner, so we positioned it a tad to the right of that. We use set.position to set the position of the sprite.

In our next shot,we have moved our sprite to another position on our screen, this one is at 250,420. This means we moved the sprite on the x position at 250, and the y position at 420. Looking at this next image you see the cat is now positioned away from the left corner original position.

In this shot, we have scaled our pixel cat, set.scale, at 5f,8f meaning we set the width of our pixel image to scale itself by 5x wide, and to scale itself by 8x tall(height), from its' original size.

And, for this final app shot, we rotate our sprite - set.Rotation. Here we use 55 as our rotate by degrees number, so the sprite gets rotated by 55 degrees.

In this next shot, you see the image was positioned at the center of the screen and a larger sized cat. This happens if you add your intended image as a texture, and don't declare it as a sprite. Not quite the small screen size image we want. In our next section, Code For This Tutorial, we'll learn how to code the texture, and then declare it as a sprite.
In our next shot,we have moved our sprite to another position on our screen, this one is at 250,420. This means we moved the sprite on the x position at 250, and the y position at 420. Looking at this next image you see the cat is now positioned away from the left corner original position.
In this shot, we have scaled our pixel cat, set.scale, at 5f,8f meaning we set the width of our pixel image to scale itself by 5x wide, and to scale itself by 8x tall(height), from its' original size.
And, for this final app shot, we rotate our sprite - set.Rotation. Here we use 55 as our rotate by degrees number, so the sprite gets rotated by 55 degrees.
In this next shot, you see the image was positioned at the center of the screen and a larger sized cat. This happens if you add your intended image as a texture, and don't declare it as a sprite. Not quite the small screen size image we want. In our next section, Code For This Tutorial, we'll learn how to code the texture, and then declare it as a sprite.
Code For This Tutorial
To edit our code for this tutorial, we first must update our import statements so we add them as shown in this next image. As we are adding a sprite and texture, we must include imports for both. And, the import for 'Application Adapter' class, and for 'spritebatch' as they are equally important, with the spritebatch drawing our image/sprite to the screen.
Next we include our game screen class, public class MyGdxGame extends ApplicationAdapter
and then add/declare our game variables(from the class members), as shown in this next image. We include one for the 'Texture - we name it texture, 'Sprite -we name it sprite, and 'Spritebatch - we name it batch'. Note: You can name the variables for the these class members as you like.
Then, at the Create method, we create the instances of our class members, functions, and methods we intend to use. To create our Sprite - sprite we pass the texture image to it with the code: sprite = new Sprite(texture);. So, we first create our texture as we would, then simply declare that texture as our sprite with that code.
In the create method, we also set the position for our sprite, and, its' 'scale', and 'rotation' values, as seen in the code in this image(and code at Example Code Section).
Lastly in our code, we use the 'draw' method to draw our sprite to the game screen. Important here is that we use 'sprite.draw(batch), and not 'batch.draw'. If we were to use batch draw then parameters we wanted to include - position,scale,rotate, would be ignored.
So, when drawing your sprites do include sprite.draw(batch);
in your draw method
batch.begin();
sprite.draw(batch);
batch.end();
Sprite Actions
Basic 'sprite' non-action animations can be done using the setRotation, and setScale code calls in Libgdx. These can be applied to the sprite object directly without converting a sprite into an actor(Stage). If however, we declare the Sprite as an Actor and add it to the Stage; then we can add real time actions to them, like moveTo, moveBy, rotateBy, fadeIn, fadeOut, and others. We will see these actions in the next few tutorials.The SpriteBatch class is ideal for rendering multiple sprites efficiently. It collects geometry (vertices) for all the sprites you want to draw and submits them to the GPU in batches.
If however, you want to create a game with more complexity or interaction, you can incorporate 'Stage', with actors.
Sprites are known as game objects, and can be created from an image, a rendered shape, or, pixelart.
updated April 2026
What is Pixel Art
Pixel art is the creation of small sized, small pixel images that are often used in 2D games to build game sprites and game assets. A Sprite is an image that can be used as a 2d object, which have coordinates (x, y) and which you can move, animate, destroy or create during the game. Typical sprite sizes for 2D games are 32x32, 64x64, 128x128, 256x256.When creating your pixelart, export your files as a .png for static images, or as a .gif for animations.
Creating Pixelart Characters
Creating and using pixelart in mobile games and windows games is common, and quite easy to do. There are now many free online websites specializing in pixelart creation and mobile apps available that allow you to get creative and make your own pixelart characters.The essence of pixelart is the small size you work with to create your graphic; common is to work a width and height of 32x32. A pixelart character creation with a 32x32 size, will take much less time to complete than one sized 256x256. The good news is that you can resize your 32x32 to 256x256, after you have completed it, while saving it; in fact, some pixelart makers like Pixel Studio will recommend SAVE sizes for you. With the larger saved size, you'll have more character size choices in your game scene - 32x32, 64x64,128x128, 256x256. Keeping with the power of two is also recommended, as these work best when packing your pixelart characters(sprites) to a spritesheet, if you decide to do so.
Quick Guide - Making Pixelart
Getting started with your pixelart character creation is pretty straightforward although somewhat of a learning curve if you've never worked with photo editing or photo creation programs.A Simple Drawing
Lets make a simple drawing to get started; just select 'Create New', and then define a 'name'(or use preset), size(use '32x32'), leave at default - 'transparent', select Next, then, use - 'simple template', now your at the 'canvas' screen window. Note: If you don't give a name now, it just uses the prefilled name, and you can just rename it later.The canvas, is where you create your masterpiece.
The canvas is where you draw your characters' outline, either with free hand, or use some shapes to get you going.
Colors
Select a color from top preselected colors row, or select the color palette(from bottom bars menu squares),and select any color you want. Then just tap into the canvas and your color appears in one little square. Keep tapping to keep adding color. You can also save your selected color, just tap to save, then select a top menu square at preset colors row,to save it. You can save to any color square, not just an empty one.
That is the simplest way to get started with pixelart creation with Pixel Studio. You are drawing free hand.
In addition to tapping in a square to color with PEN tool, you can also use the 'brush' tool, from bottom rows menu; it covers more area at once than a pen.
Note: To Save your work and quit the app, just select the 3line(colored) icon,(at right side just above the bottom rows), and select Save and Quit.When you reopen the Pixel Studio app, it goes to the canvas and your last creation is shown. You can continue working on that character, or to start a new character, select 'Create New', also at 3line, colored icon.
Shapes
If you prefer, you can also add shapes first to the canvas, and then just fill in the shapes, with the colors you want. Since most pixelart characters, have a dark border around them, recommended is black. So select black color for your free hand outline, or before drawing shapes.
Our First Pixelart Character
This next image is a shot of the pixel studio canvas, with three shapes drawn into it. A circle, square, and a line. Using these 3 shapes, we have drawn an outline of a simple game character. The line, is drawn for arms and legs, the square, for body, and the circle shape is for the character's head.
You can view/select the shapes; from menu bar row - squares, across the bottom of the editor, Select the Shapes square.
Once you click into shapes(is selected in the example image shown here, with shape line selected -, look just below the canvas to see all 6 shapes available), all 6 shapes appear topside. Just select the shape you want from the 6, then tap the menu bar's shape square selection box again.
Next, tap the canvas where you want to start the shape; and then drag to draw out the shape you've selected, and its' size.
When done with drawing shapes, to unselect shapes, just tap into the shapes square again(at bottom menu row), then, just select the PEN box and select your pen size(at setting can change), default is 1, which is fine to outline, and draw your shapes.
Now that you have your character's outline drawn, you can use the PEN to start drawing in your colors. The PEN is next to the color palette, on the bottom rows menu selections.
Contrast Colors
It is the contrasting of same colors that facilitates the pixelart look, and gives texture, and better detail to the image. You can do this yourself by selecting a lighter or darker color of the color you want to contrast. Just tap to add the contrast color to individual litte squares. Usually you add contrast color to corners, edges, and to create the sense of light, shadow. The dither can do this also, it is at the bottom rows menu also. Once dither tool is selected, just tap into a color, and it adds either a lighter or darker color.
This is the pixelart cat character used in this tutorial. You can see the dark outline around the entire image, and then color and contrasting color is added to draw the cat details. Since the overall cat body color is light grey, our contrasting color is a darker grey, and also added some white color to define specific areas, like the cat's feet, and whiskers.
I found this pixelart character on the web, free to use.
Tracing Images
Besides using your own creativeness to design your pixelart characters, you can also use 'tracing' to outline an already made character while adding your own style for color and detail. This provides a simple and easy way to to get going with pixelart creation while you hone your creative skill.The Free Pixelart Creation App and Website - Pixel Studio-mobile app, and Pixilart - website for desktop creation, allow for Tracing of images. Basically, you load the image you want to trace, and then use the pen/pencil tool to trace around the image, making sure to add a New Layer, typically Layer #2, for your pixelart creation. Once you've added all the colors, and your done, you can delete the background layer(1st layer). Important is that you remember to Add a New Layer, before you start your outline of the image, and that you have the New Layer selected. So, typically Layer#2 is your working layer, Layer#1 is the original image your tracing. Add new Layer, and click to use that layer, layer#2. Once trace is done, delete the Layer#1, and Layer#2, becomes Layer#1. Now just save your image, SAVE AS, as a png. Select size 256x256, that way, you can make smaller sizes of it.
With Pixel Studio: first SELECT Create New, Open>>3Dots>>[From Files] - select - Add Image, if you are loading your image for Tracing. To trace a premade pixelart image, you load the image as the background for first layer(loaded image automatically goes to first layer), and then you can use opacity for the transparency(at tools icon) you want.
Opacity
You lower the transparency(opacity) on the 1st layer(the loaded image) because that makes it easier to see the colors you are adding while you trace over the image on the second layer. Next, click into the layer next to the background(the Image loaded) layer. This is your Layer#2 - the layer you want to keep active shown in this next screenshot.
Adding Layers
You can also add additional Layers by selecting the "+" icon, at Layers. Then select Pen icon, and pen width(at settings icon for this).
Before you begin, check layers, the active current layer has a colored yellow solid block around it, as seen at Screenshot; this indicates it is the layer you are now working on - active or working Layer.
Next, start outlining the image using the PEN, with your finger on the screen, edge around image with a dark color like black(common for outlining), select black color from top of screen, at color squares, or select color from palette bottom of screen, and select new color.
Choose 'select' to use a color, and SAVE, to add it to top screen color squares, but first tap a square with + icon, to save the selected color, or save it to a preselected color slot(replaces the color there now).
To color your image's squares, first tap to select a color, or tap the color palette and select a new color. You don't have to save a new color in order to use it.
Color - trace your image: Tracing or not, you follow the same color process, just tap each little square to add the color. You can change the pen size, if you need to color a large area.
Undo Arrow
Any mistakes, just click undo arrow, then tap a square to color again.
Then just redo that area again. You don't want to draw one continuous line around the entire image, because if you make a mistake, you'll have to re outline the entire line. So, short lines are best, especially for outlining the image. A pen size of 1 is common for outlining your image in black.
Tracing Image:
Set the Pen width/size with a toggle bar.
To Outline The Image
Set PEN width to 1, 2, is common; but depends on the image, especially if Tracing it. For this next screenshot you can see the Blue Chiibi warrior I loaded into the editor.
I did not use 'Create New', to upload my image, instead I selected 'OPEN', and 'Open' >>From files, then selected my image from the images on my phone. Now I can trace the image.
If I were to use 'Create New', I have to select a pixelart small size like 32x32, and then if I load the image afterwards, it just looks overly distorted because its much larger than the 32x32 size I want to create.
However, if we want to create a new character(no tracing), we select >> Create New , select size 32x32, and prefereed options.
Mini Map
Also note the mini map, a smaller version of the chiibi warrior on the editor screen - this you can toggle on or off from settings. This is good because it lets you see the actual layer your working on, so you see if your colors are where you want them, and, that you added enough color. The 'mini map' is especially useful when tracing an image.
First draw complete outline around the image your tracing. Then start your color and contrasting colors. Once you complete all the outlines and the image is completely colored- the second layer, (your creation), just delete the first layer before saving the image.
Save Your Pixelart
To Save the image; select '3lined color icon' right side menu; SELECT Save, and save to File(or photos)and, save it as type png(recommended) - example: myart.png. You can also Resize the Image before saving it; 1x,2x,3x,4x,- the original image size; and might see a 'resize to avoid BLUR' recommendation also; just select 2x, to see if the 'avoid blur message' changes to Resize, if so, all good at that resize you selected. Usually selecting 256x256 is good for this.
Merging Layers
Note: Make sure you are at Layer#2, before saving(if you Traced an Image); usually you delete Layer#1,the image you traced, then your traced layer will become Layer#1. From there you can add additional layers if you want. For example, you decide to add a weapon to your warrior, but you don't want to add it to the first layer.
You create a second layer, add your weapon, then flatten both layers, merge the layers, 1 and 2, and, THEN SAVE, the image, with SAVE AS, To check your on proper layer, look for SOLID line color around square of current Layer; this indicates its' the layer your working on, and Layer # number shows atop the layers. To 'merge layers', first, select, Merge Icon,(3 layers icon), at bottom rows menu;(this populates Tool icon); then select, 'Tool icon', at right of bottom rows, then select 'Merge all Layers'; now save your image, with SAVE AS.
Note: Before a Layer gets deleted in Pixel Studio, you will see a dialog, asking 'Is This The Layer You Want to Delete'. and,
Before Layers are merged, you will see a dialog, asking, 'Do you Want to Merge all Layers'.
To Save your work and exit Pixel Studio app
Just select at settings - icon -3lined color icon; and select the SAVE & QUIT.
To reopen Saved work, just tap the '3line color icon'; click TABs at very top of dialog box, select the image you want to OPEN, tap the checkmark at bottom right of dialog box. Your selected image will open in the pixelart editor. Pixel Studio opens with the last image you were working on.
Alternatively, you can use the 3Line Icon, Open >> 3Dots >> From Files, to open any image from your phone, including those, you are currently working with. and, also -
Open >> click Folder, to open pixelart - already created and saved.
Pixilart - Online Website for Pixelart Creation
The online website, Pixilart, where you can create pixelart and pixelart animations, has a similar process for making pixelart .png types. First, in settings, check that 'Tracing' is ON, then once image is loaded, set a second layer,(loaded image auto goes as background, or 1st layer), again you can toggle opacity as you like. Set the image size with toggle bar. Save your image when done, png type is best for non animated creations. To Save your work, you can delete 1st layer, but with Pixilart, first layer(when tracing is on) does not get saved.
To Note: When tracing an image, the image you trace must be pixelart small size or else the image won't load proper in the editor, making it difficult to trace(assuming of course, your tracing for pixelart). Look for 32x32, is good.
There's plenty of small size pixelart characters you can find online and chiibi characters are good also, they are small and popular for mobile game dev. I found some at, OpenGameart.org - I listed their website on this page.
Free Pixelart Creators
The Pixel Studio android app is free to download and install on your device. It does have in app purchases for some things like making game 'tilemaps', however, there's lots of free features to keep you busy. With Pixilart website, it's also, free; in fact, you can start creating without joining. However, if you join (for free - email), then you can save all your pixelart creations.
You can also make pixelart animations at Pixilart website, and at Piskel website, the links listed on this page also. It is recommended to save pixelart images as .png type, and animations as .gif type.
More on creating Pixelart characters and game scenes as we continue our tutorials.
Game Types
Now that you know something about creating pixelart, we will discuss the types of mobile games and windows games that can work with pixelart characters and pixelart fixed game assets, like scenes, backgrounds, and tiles.
2D GAME PERSPECTIVES
When making mobile and windows games, you can consider three types of game perspectives from which to build your 2D game interface. Those are: isometric, top-down, and side-on. Important, as each one requires that you draw your pixel art in a specific manner.
ISOMETRIC PIXEL ART
In this game perspective, all three visible sides of a cube will be the same size. In other perspectives like topdown or sideon, this is not possible. With this type, creating your pixelart takes longer than the other perspective game types.
TOP-DOWN PIXEL ART
With this type, the user looks down over the game, as though the camera were overhead. Making pixelart is less cumbersome with this type as only the head and shoulders of the characters are most visible.
SIDE-ON PIXEL ART
Known as a platformer mobile game type, this one takes a side-on perspective. These types can include lots of acrobatic challenges, and actions added to the sprites. With this type of view, the character's head, shoulder, and legs are visible, so making the pixelart would take more time, especially for the intricate animations.
All three types have been made with plenty of famous games. The one you choose depends on what you want to achieve in your game; and time you want to spend making your pixelart sprites.
WHAT SIZE OF CANVAS SHOULD YOU USE FOR PIXEL ART?
A mobile game screen is pretty small, especially on cell phones. So it's important to consider the resolution for the game you want to make, taking into account what has to be placed in the game screen area; like, sprites, scenery, dialogue boxes. Commonly, these resolutions are used for game play:
160px by 144px
240px by 160px
256px by 240px
256px by 224px
HOW MANY PIXELS SHOULD I USE FOR MY SPRITES?
The ratio of your game characters to the total game screen resolution is another consideration when making your game. For example: a ratio of 1:24 will make your characters look big on screen, while a ratio of 1:250 will make your characters look much smaller.
Best Practice:
Draw all of your game objects in a 1:1 tile in your chosen software. Mostly, this is at 8:8 or 32:32 pixels. For example, a 8x8 tile size has 64 pixels, whereas a 16x16 tile size has 256 pixels. The rule of pixelart: the more pixels, the more time you must take to make the sprite.
PIXEL ART COLOR PALETTES
It is also a good idea to limit the amount of different colours you use in making your pixelart sprite. Not more than three colors is recommended. And, it is good practice to use only one area of saturation in your game.
Game Assets
There are websites offering free game 'assets', including pixelart characters, and fixed assets, for your game dev. Here we list some of them with free assets you can use. And, we included mobile apps and online websites where you can make pixelart for Free. I used Pixel Studio, a mobile app pixelart creator, to make the a game character warrior which we'll use in our next few tutorials.
Free Pixel Art: Sets and Animations
OpenGameArt.org Free, No Registration Required
GameMaker: Free Asset Bundles:
Free Downloads Free, Must Join. Is Free
Get Frames From An Animated Gif
ezgif.com Free, Online, No Registration Required
Make Your Own Pixel Art For Your Game(Android)
Pixel Studio App from Hippo Free, Good Rating
Pixilart Online- Pixelart Creator and Makes Pixelart Animations,
Join For Free - to Save Your Creations
Pixilart for Mobile Free, Good Rating
Piskel Online - Pixelart Creator Makes Pixelart Animations Free, Web Based
EXAMPLE CODE - Code For This Tutorial.
JUST copy and paste to update your code.
JUST copy and paste to update your code.