Libgdx with Android For Game Dev

Game Dev Tutorial IIIII : Images with Fonts
Next: Tutorial 6: Viewport & Camera
Browse all Game Dev Tutorials from our Blog
Image Fonts
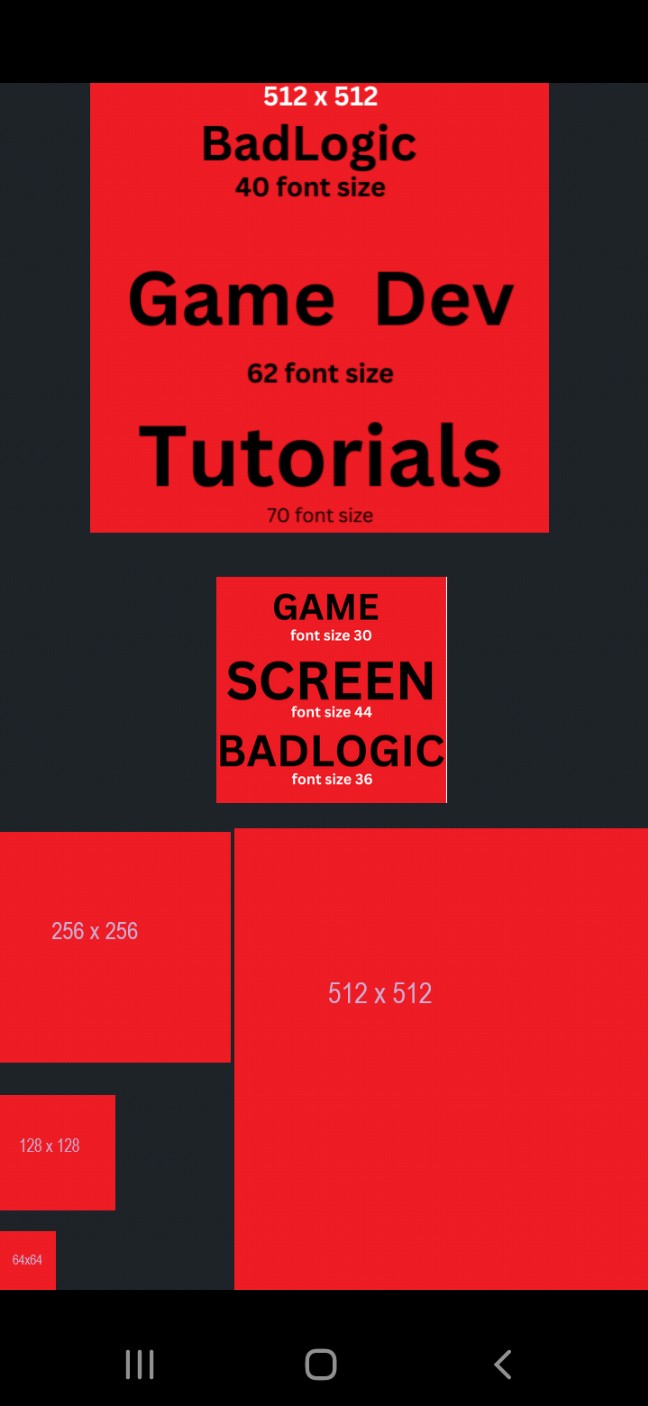
App Shot - Game Fonts
Screen Size 5.8
For this tutorial we are going to create a new template game app, Game Fonts, and add fonts by way of images so you can see how to make them and also, how much screen space the different image and font sizes require. Usually, when you create your mobile game, you target one screen orientation; either portrait or landscape. Then, making your images the appropriate size will allow them to scale across several device screen sizes without affecting the game play. In other words, you want the images to position themselves in the same location for each device screen that your game is installed on.
This screen in this appshot is 5.8", so i must make my images knowing that they could be installed on a smaller screen size and also a larger screen size than 5.8". Smartphones can be anywhere from 5" to 6.8" in screen size, so you can create your image fonts to target for those.
And, if you intend on having your mobile game available for larger device screens like tablets, then you must make your images to accommodate those devices also.
You can of course, just target one screen size if you want, and you simply state this when adding your app to an app store. But you can get more downloads if you have a game that is compatible with a variety of screen sizes.
First, select the little dots in the middle of the AIDE coding editor; then select 'Create New Project', then in the dialog that you see select 'Mobile Game', and 'New Mobile Game'.
For the app name, enter, Game Fonts, and for the Package Name, enter com.aac.gamefonts. Select, 'Create', to create your new game screen. From there, the AIDE editor opens with the default code showing. We will change the code in our MyGdxGame.java file, as we add our app images.
FYI

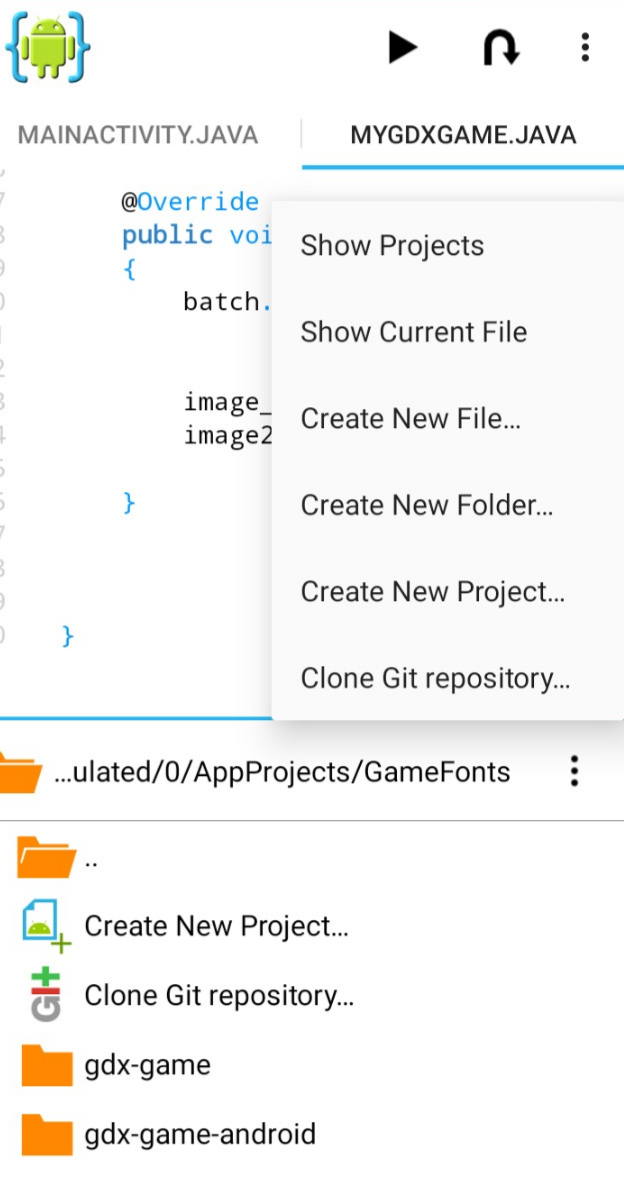
To get to the files for this app, select the top dots in AIDE, then select 'View Files', then select the app name 'Game Fonts', then select, gdx-game folder, then, src folder, and finally, MyGdxGame.java to open it in the AIDE coding editor. To go back in the file hierachy just select at the top of files, the little orange file folder; and keep clicking it till you get to the folder you want. And, to view the files hierachy at anytime; you can also select the middle of screen dots in AIDE, select 'Show Projects', and then select the app project you want from the list. And, lastly just click the folders until you get to the folder or file you want.
The 4 images placed at the bottom of the screen show the sizing of 64x64, 128x128, 256x256, and 512x512. The top 2 images, show the font sizes for the text that is written on the image. So, the top image, at text 'Game Dev' has a font size of 62. If you wanted to have this size of text on your game screen you would use the 62 font size when coding the font, or making a image with the font size added to it. Remember, this is a 5.8" screen, so if you were looking to code this on a smaller or larger device screen, the image would have to scale to those screen device sizes.
Squaring Images
We also can tell that the image sizes of 256x256, and 512x512, are probably the best choices for this screen size. If we were to use the 128x128 image size the text would have to be really small and probably would not scale well, especially if we were adding fonts to it, or for a larger screen size.
FYI; in libgdx, the images should be squared like 64x64, 128x128, and so forth. This makes it easier to process them, especially when using Spritesheets which we will learn more about as we continue our game dev tutorials.
Free Online Photo Editors - Game Assets
To make these images outlines and the text added, you can use one of several free online photo editing websites, like Canva. First make your image size, color it, then just add the text you want. Finally just download it to your computer, or android device if using their mobile app to make them. With Canva, you can make and edit your image, without joining for free, however, if you join, you can save all your image work. I personally use Canva and others. At Google PlayStore, you can find many free photo editing apps. And, you can also get free and paid 'assets' from online game resource websites.
A game asset could be a figure for your game, like a car, or a warrior, or it can be an entire game theme, complete with fonts and tiles and the like. Spritesheets are also game assets. A spritesheet is sheet with lots of photos and game figures, or a single figure for game animation with all the sequences required for the animation. There are a lot of assets to choose from.
Texture(Gdx.files.internal("badlogic_image.png"));is how we added our texture in the previous tutorial. However, in this one,
f64x64s = new Texture("f64x64s.png"); is used for each image we want to add.
This is another way you can add textures, and more commonly used, when your adding several of them.
You can name the images as you like. Follow this code method for each image added. And, don't forget to add the 'SpriteBatch batch;', very important.

Add the extension name for each image added.(.png)
And, the 'batch = new SpriteBatch();', very important.

The two top images have different x values, because they are not lined up similar, and one is positioned taller than the other, hence, the y value of 840 for the top image. It does not matter which image you add first for this coding, however, if you were adding a lot of images you probably want some type of logic so that it is easy to update and keep track of your game code. We don't see the x and y in the code itself, however, we know that when positioning textures, the first parameter is the x value, and the second one if for y value. And, x runs along the bottom of screen, and y runs along the height of the screen. To finish our coding for the render method, we include the 'batch end();'.


Setting Background Color with RGB Color Codes
Another method we can add to our render method is the background color of our game screen. As we previously learned, we can add single numbers like 1,1,1,1; or 0,0,0,0 to get basic colors. But by using the RGB color codes as shown in the code here, you can add just about any color you like as your screen background color.
Gdx.gl.glClearColor(30/255f, 35/255f, 40/255f, 1);, is the code, and, 30, 35, 40, 1, are the actual colors for the grayish black background for this app. Each number you select must be coded with the /255f also as shown.

After you have drawn your textures, you must dispose of them. Otherwise, your game could lag over time, if you don't dispose of them. Each one must be disposed of separately as shown in this code. There are some game code components that when added do not require you to dispose of them, and we shall learn more about them as we continue our tutorials.
FYI:
You can have code in your page but use the // in front of it so it is ignored when the app is RUN.
Example: //texture = new Texture(Gdx.files.internal("android.jpg"));
The entire line would be ignored. If it wraps to another line then just add the // to that line as well. This comes in handy when your trying out different codes to see how they might look on screen without having to retype whole blocks of code. And, useful for notating your code.
Next: Tutorial 6: Viewport & Camera
Browse all Game Dev Tutorials from our Blog
Image Fonts
For this tutorial we are going to create a new template game app, Game Fonts, and add fonts by way of images so you can see how to make them and also, how much screen space the different image and font sizes require. Usually, when you create your mobile game, you target one screen orientation; either portrait or landscape. Then, making your images the appropriate size will allow them to scale across several device screen sizes without affecting the game play. In other words, you want the images to position themselves in the same location for each device screen that your game is installed on.
This screen in this appshot is 5.8", so i must make my images knowing that they could be installed on a smaller screen size and also a larger screen size than 5.8". Smartphones can be anywhere from 5" to 6.8" in screen size, so you can create your image fonts to target for those.
And, if you intend on having your mobile game available for larger device screens like tablets, then you must make your images to accommodate those devices also.
You can of course, just target one screen size if you want, and you simply state this when adding your app to an app store. But you can get more downloads if you have a game that is compatible with a variety of screen sizes.
Create Our New Template Game App - Game Fonts
First, we must create our new game app, which will provide us with our game screen so we can add our images to it. So, like our first tutorial, we must create a new mobile game from the 'Create New Project' in our file hierachy.First, select the little dots in the middle of the AIDE coding editor; then select 'Create New Project', then in the dialog that you see select 'Mobile Game', and 'New Mobile Game'.
For the app name, enter, Game Fonts, and for the Package Name, enter com.aac.gamefonts. Select, 'Create', to create your new game screen. From there, the AIDE editor opens with the default code showing. We will change the code in our MyGdxGame.java file, as we add our app images.
FYI
To get to the files for this app, select the top dots in AIDE, then select 'View Files', then select the app name 'Game Fonts', then select, gdx-game folder, then, src folder, and finally, MyGdxGame.java to open it in the AIDE coding editor. To go back in the file hierachy just select at the top of files, the little orange file folder; and keep clicking it till you get to the folder you want. And, to view the files hierachy at anytime; you can also select the middle of screen dots in AIDE, select 'Show Projects', and then select the app project you want from the list. And, lastly just click the folders until you get to the folder or file you want.
Adding Game Images (textures)
Now that we have created our mobile game from our mobile game template, we can begin to add our images. As previously stated, images in libgdx game dev, are known as 'textures', for the purpose of coding them. So, in this tutorial we are adding 6 unique images-aka, 6 textures. All the images are png file type, and as you can see by looking at our app shot, they also have text and font sizes written on them.The 4 images placed at the bottom of the screen show the sizing of 64x64, 128x128, 256x256, and 512x512. The top 2 images, show the font sizes for the text that is written on the image. So, the top image, at text 'Game Dev' has a font size of 62. If you wanted to have this size of text on your game screen you would use the 62 font size when coding the font, or making a image with the font size added to it. Remember, this is a 5.8" screen, so if you were looking to code this on a smaller or larger device screen, the image would have to scale to those screen device sizes.
Squaring Images
We also can tell that the image sizes of 256x256, and 512x512, are probably the best choices for this screen size. If we were to use the 128x128 image size the text would have to be really small and probably would not scale well, especially if we were adding fonts to it, or for a larger screen size.
FYI; in libgdx, the images should be squared like 64x64, 128x128, and so forth. This makes it easier to process them, especially when using Spritesheets which we will learn more about as we continue our game dev tutorials.
Free Online Photo Editors - Game Assets
To make these images outlines and the text added, you can use one of several free online photo editing websites, like Canva. First make your image size, color it, then just add the text you want. Finally just download it to your computer, or android device if using their mobile app to make them. With Canva, you can make and edit your image, without joining for free, however, if you join, you can save all your image work. I personally use Canva and others. At Google PlayStore, you can find many free photo editing apps. And, you can also get free and paid 'assets' from online game resource websites.
A game asset could be a figure for your game, like a car, or a warrior, or it can be an entire game theme, complete with fonts and tiles and the like. Spritesheets are also game assets. A spritesheet is sheet with lots of photos and game figures, or a single figure for game animation with all the sequences required for the animation. There are a lot of assets to choose from.
Adding the Textures
Next, we are going to add the code for our textures. As you learned in our previous tutorial, to add our texture, we must include the variables, create, render methods, and dispose of our textures. Looking at the code for this app in the Example Code section this page, you see that the texture code in tad different than the previous tutorial where we added texture. This codeTexture(Gdx.files.internal("badlogic_image.png"));is how we added our texture in the previous tutorial. However, in this one,
f64x64s = new Texture("f64x64s.png"); is used for each image we want to add.
This is another way you can add textures, and more commonly used, when your adding several of them.
The App Code
Add Declare Variables
Here we add the texture names one per line as shown.You can name the images as you like. Follow this code method for each image added. And, don't forget to add the 'SpriteBatch batch;', very important.
Create Method
This next image is the create method, again, add each one to code.Add the extension name for each image added.(.png)
And, the 'batch = new SpriteBatch();', very important.
Render Method
The 'render' method is where we draw our textures so they shown on the game screen. And, we also position the images, similar to how we positioned text in our previous tutorial. The first 3 images from the bottom of the screen are coded first, as shown with the x position of 0, meaning they all line up at the same x position on the screen. However since each one is higher than the previous their y values are different as shown in this image.The two top images have different x values, because they are not lined up similar, and one is positioned taller than the other, hence, the y value of 840 for the top image. It does not matter which image you add first for this coding, however, if you were adding a lot of images you probably want some type of logic so that it is easy to update and keep track of your game code. We don't see the x and y in the code itself, however, we know that when positioning textures, the first parameter is the x value, and the second one if for y value. And, x runs along the bottom of screen, and y runs along the height of the screen. To finish our coding for the render method, we include the 'batch end();'.
RGB Color Codes
Setting Background Color with RGB Color Codes
Another method we can add to our render method is the background color of our game screen. As we previously learned, we can add single numbers like 1,1,1,1; or 0,0,0,0 to get basic colors. But by using the RGB color codes as shown in the code here, you can add just about any color you like as your screen background color.
Gdx.gl.glClearColor(30/255f, 35/255f, 40/255f, 1);, is the code, and, 30, 35, 40, 1, are the actual colors for the grayish black background for this app. Each number you select must be coded with the /255f also as shown.
Dispose Method
After you have drawn your textures, you must dispose of them. Otherwise, your game could lag over time, if you don't dispose of them. Each one must be disposed of separately as shown in this code. There are some game code components that when added do not require you to dispose of them, and we shall learn more about them as we continue our tutorials.
In Summary
In this tutorial, we learned of another method to add our game textures, and how to position them on the game screen. Game fonts can be added as images, and they are quite useful as they can scale across different device screen sizes. Each texture added must be declared, created, rendered, and then disposed of to reduce the possibility of game lag. Images added to your game should be squared by 2. This is necessary for efficient processing and when using spritesheets in your game. You can find game assets, including spritesheets at mobile game assets websites. One of the largest is the Unity Assets store which can be used for most libgdx games. In addition to buying assets many of these websites have a collection of free ones.FYI:
You can have code in your page but use the // in front of it so it is ignored when the app is RUN.
Example: //texture = new Texture(Gdx.files.internal("android.jpg"));
The entire line would be ignored. If it wraps to another line then just add the // to that line as well. This comes in handy when your trying out different codes to see how they might look on screen without having to retype whole blocks of code. And, useful for notating your code.
EXAMPLE CODE - Code For This Tutorial.
JUST copy and paste the code required for this tutorial.
JUST copy and paste the code required for this tutorial.