
Next - TUTORIALS III
Next Tutorial
Android, onClick Example
Prev Page
View All Tutorials
ANDROID TUTORIAL, CODING RESOURCE ID
For this tutorial, we are going to learn about resource id, known as resource identifier, R.id, and how they are used in the layout file like, main.xml, and why they are important to the corresponding java class file, like MainActivity.java.
To implement our example, we will code two buttons, and add our 'Resource id', to each button. Text is added to each button as well. For this, we use the android text attribute instead of adding the text to our strings file(strings.xml).
Since our text in each button is short, we can use the 'android text attribute' in our button element.
We are going to create a new app for this tutorial, and name is - AndroidIdentifiers
Where Code is Coded
This app will have some header text (wording) so we will add a TextView element and add it to our strings.xml file, for that text.As you previously learned, string names are coded in the strings.xml file at res/values of your app project.
And, since we are adding a text header, we need to add a TextView element to our layout.
For this tutorial, our app, AppProject/AndroidIdentifiers, and the reference to the string name is made in the TextView element.
The TextView and Button elements are added to the main.xml file, located in the resource folder of your Project Name.(res/main.xml).
Commonly known as the layout or layout view; find it at AppProjects/AndroidIdentifiers/res/layout/main.xml
You only need to replace the code on main.xml, and strings.xml, for this tutorial.
To do so, copy the code from our Example Code section on this page to replace what's on the page now. MainActivity, does not need to be updated, but we included the code.
NOTE: If your coding with the newest edition of AIDE, the files hierachy may differ, just look for your java folder, as this contains all the java class pages like MainActivity.java; and is where you create new java class pages if you need to. Typically at app/src/main/java, from your app name folder
And, for your xml files,(layout pages) goto folder res typically at app/src/main/res, from your app project name folder. This is your apps xml pages and where you create new ones if you need to.
Creating Our New App

Open AIDE, Select New Project, from the left menu, or center menu hierachy of files; and do the following:
Choose HELLO WORLD example app template(java/xml);
if
Coding With Newest AIDE version:
choose 'New Android App, Gradle/Android SDK/Java XML Programming'
For app name; type AndroidIdentifiers
For app package name type: com.acw.learnidentifiers
Click Create
Now your new app has been created with the name 'AndroididIdentifiers'.
This new app name will show on the left menu hierachy in AppProjects within AIDE.
The main.xml, and mainactivity.xml, pages of your app are opened in AIDE for you. Just click the top tab to toggle them.
The other app pages you may need to make changes to like strings.xml, AndroidManifest.xml are also created; and you can find and open them by browsing your file hierachy on the left menu after clicking on your Apps' Name.
Once you open a file it stays at the top ov your AIDE editor where you can easily toggle amongst the various file names, and the page you choose opens in your editor.
Also in your AIDE settings (at right side menu in AIDE), choose the selection to SAVE files automatically.
Just double click a file to open it in the coding editor.
Also,
To open your other app files do the following:
Click FILES, from top right dropdown selection: (all files now show on left side menu) Select your 'app name'from the file hierachy, then just click each folder name to see all files for your app.
Click the orange color folder at top of folders to go back to previous folder in your current app or to the beginning to select another app you have created.
![]()
To goback to previous FOLDERS, just click 'orange folder', as shown here, it returns to previous folders.

To open androidmanfest.xml file, click on App name AndroidIdentifiers, then look to bottom of file hierachy; to see androidmanifest.xml file,

just double click to OPEN it in AIDE editor.
To CLOSE A PROJECT; Your app, from right side menu dropdown, choose, MORE, then Close Project. To OPEN a file, just choose App Project name from left side menu, then select an 'app name' to open app folders for that app.
Coding Our Strings.xml
We will add one line of header text that reads:
"Learn To Use Resource Identifiers in Code". We will name our string, learnidentifiers, and
type the text as shown.
Our strings.xml file also has another string, our: app_name,AndroidIdentifiers, which we will leave in the strings.xml as this is the name that shows at top of view, next to the little green android icon. It is created for you when you created your app using the simple java/xml template app.
Once the text is added to the strings.xml file, SAVE the file.
Using android:id Resource Identifier
How And Why To Use Them
It is common in android app development, to use resource id.They are used in TextView elements, Button elements, ImageView elements; and other user interface widgets and components.
The resource id is a 'resource identifier', meaning it lets the android system know where that resource is located and enables the system to get info from it if it needs to.
This is important when we want to manipulate code(make something happen) from the code in our xml file elements.
For example: If I add a button element to my layout file at main.xml, using the button element. And, want that button to be clickable. How do I make it clickable?
In order to make the button clickable we first need to have a way to find that button; we do this by adding the id. resource identifier
Adding A Resource Id
To add the resource id we use the attribute;
'android:id ="namegoeshere', and it is coded in your element, like a TextView, ImageView, or a Button. It doesn't matter which line it is at in the element, nor what name you give it.
However, the name you use must also be used in the java class corresponding page when you want to perform an action.
That's how the android system is able to connect xml pages to the java class page where the intended action is coded.
If your adding a resource identifier for the first time, (new one), then you use this code in your xml layout page element; android:id="@+id/namegoeshere", The +, symbol indicates that this is new resource ID, and the android aapt tool creates a new resource integer in the R.java.class.
text1 is the name i gave it, as mentioned, you can name it anything you want to.
android:id="@+id/namegoeshere android:id="@+id/text1
findViewById(R.id.text1);
The android:id="@+id/text1, name is now a resource ID attached to this element.
You can then refer to the element(TextView, Button) to which the ID is associated in your Java coded page which then performs the intended action (executes the code).
The onClick method is the most often used method to connect layout elements with intended actions that are coded in java class pages. Terms like "event handling - handlers', and 'ui controls' also pertain to coding methods for attaching layout resource id to executable code in java classes.
You will learn more about these as you complete additional tutorials.
You can add resource ids to your elements even if your not going to use them in your java page right away. It is good coding practice to add them, that way, if you do decide to write
code to add controls to them, the resource id are already coded.
An example of adding a control (intended action)
would be: adding a resource id to a Button element, and then
making that Button clickable in order to do something.
When a user clicks the button something happens; examples - a message appears, a photo appears, a new page appears, a signout button appears, share this page message appears. The possibilities are numerous, but they all need the resource id at the xml page element (like a TextView), in order to attach xml code to java code.
Java class code is where code gets executed in android. The java code gets its' information from the layout code (xml). It then uses that information together with its own information(code) to complete its execution of code.
Buttons With Text Added
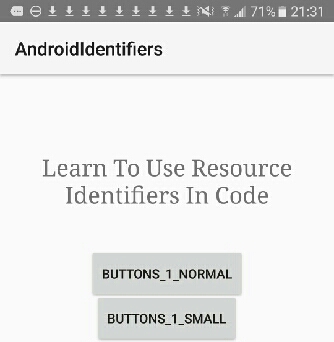
For this tutorial we are creating a couple simple buttons to our app by coding them at our main.xml layout page using the Button element. Each Button has a resource id added as shown in this image and, also seen in the Example Code section on this page.

The first button is just a basic layout button. We did not add any width or height, so it is a basic system generated button. You can add additional attributes to it if you want to.
To add our text to this button, we used the 'android:text' attribute. This is common practice when adding short text to buttons, and eliminates the need to code a 'string name' for it.
The next button is a small button, and we used the available android system 'style' code for creating this size button. This is also a pre defined system generated button. Like the first button, we used the 'android:text' attribute for the button's short text.
This saves you some coding time, especially if you need to code a lot of buttons of the same size. You do not have to add a width or height, however, you can style it as you want by adding additional attributes like text color, background color, font size, font style, letter spacing, bold text.
In Summary
In this android tutorial you learned how resource identifiers are implemented in a layout element. They can be added to any element, like a Button, TextView, or Imageview.
By adding a resource id to each element you code, you are able to perform actions on those elements if you want.
As mentioned, you can make a button clickable so the user can view something (like a message)when they click the button, or they go to another page in the app.
Using resource ids allows you to add more functionality to your apps.
About MainActivity.java & main.xml
The first java coded page in your app is usually named: MainActivity.java. The first xml page of your app is usually named: main.xml
This is common if you use a template to create your app as we do when using AIDE.
Each additional pages you create can be named whatever you like. The file extensions are created automatically for you when you create the page name. Example: you want to create a new xml page named: learnbuttons.xml; then you click create
new xml page in the res folder and just type the name example, `learnbuttons`, AIDE editor usually adds the .xml extension to the file for you. If it doesn't just add the xml yourself. Click to rename it and add the .xml extension.
Same for java class files, click to create one when your in the 'java' folder, (and you can see pages already created with the '.java' extension).
To practice coding, you can get additional Button attributes from our previous tutorial on Buttons Types and, how to place Buttons within your View.
COPY/PASTE CODE
You can get the code from this tutorial from our EXAMPLE CODE section on this page.
You can add the code easily to your apps coded pages using copy/paste. Just delete
the code that's in your main.xml, and strings.xml files and replace it
with the code from this tutorial. Save each page after pasting the code.
SAVE each page after editing, or enable 'automatic file save', in settings in AIDE.
Reading on android:id value, and Accessing Resources in Code at Android Developer
Coding Resources android:id in layout file
How Tos - Accessing Resources
JUST copy/paste the code for this tutorial App Name is 'AndroidIdentifiers - located at AppProjects/AndroidIdentifiers in AIDE, open the AIDE app, then open App Projects, THEN select the 'AndroidIdentifiers', app from your files hierachy(left menu); then click on any file from the app, like strings.xml Make sure at top of page, the app name 'AndroididIdentifiers' is there next to AppProjects like so: AppProjects/AndroidIdentifiers, then you know you have the proper App.
Once a file is in the editor, you can edit, save it, then RUN your APP, Install,
and Open your app.
Make sure you SAVED EACH PAGE, before you RUN your code. SAVE, RUN, INSTALL, OPEN, your AndroidIdentifiers App. Once it has been
installed on your tablet, you can open it Simply by Clicking on the Android little green App Icon,with the wording 'AndroidIdentifiers' on your tablet. It will
be with your other installed apps.
If you make further changes to this App, you need to SAVE, RUN, UPDATE, INSTALL, OPEN the app.
This free script provided by
JavaScript
Kit
AIDE for creating Android Apps on your tablet or cell phone(android).
Free and Paid.
GoTo Aide
ANDROID STUDIO - for creating Android Apps on your desktop computer.
Free to Install and Use
Learn more - Android Studio
The Java XML files we code(example codes) and the Android Apps we create in our Free Tutorials are compatible with Android Studio and AIDE. Just choose Java XML as your Programming Language.
You May Like:
Make Sushi Rolls
Pro Tips Photography For Point & Shoot Cameras