
Next Tutorial
Coding a Frame Animation
Prev Page
View All Tutorials
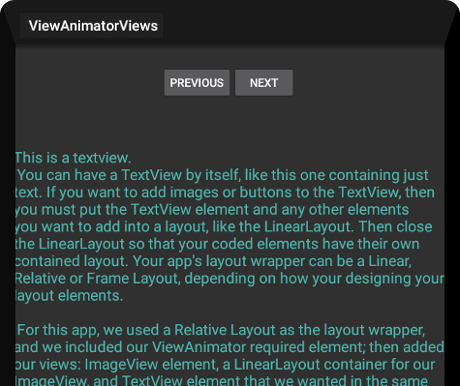
This is the App Photo - View Animator with Views


In our previous tutorial we coded a View Animator with an array for images. In this tutorial we are going to code a View Animator with Views. A view can be a TextView, an ImageView, a Button, or any combination of these elements.
For our View Animator, we coded a TextView, a TextView with an ImageView, a Button with text, a Button with an Image and text, and an ImageView.
To code these we added our required View Animator element, then we added our Views. For views that we wanted together like the TextView and Imageview, we put those within a LinearLayout container; that way, they will display as one view, with both elements, a TextView and the ImageView. This is the code.

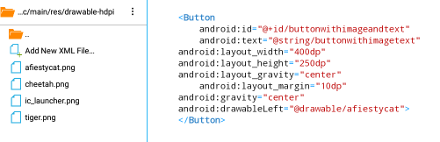
To code our Button element with the Image and text, we simply coded a Button element, then added the Image and Text to it. The text is coded in our string named 'buttonwithimagetext', in our strings.xml file.
To put the image to the left of your text you can use the android:drawableLeft attribute as we have done. If you wanted the image to the right of the text then you would use android:drawableRight attribute in the button code. This is the code for the Button with an Image and Text.
Material Design Theme
We implemented the Material Design dark theme for our app theme. Because we are using a android/java/xml template app to create our app tutorials, the Material Theme Light app theme is added for us automatically in the styles.xml at res/value-v21 folder of our app project.

Because we want to change the theme color to the darker theme, we simply need to change the theme name in the styles.xml file from Theme.Material.Light to Theme.Material. You can copy paste the code for this from the Example Code section on this page.
Additional Reading at Android Developer Website:
View Animator
Create New Project;
Then, choose
New Android App(gradle, android Java/xml)
or
Hello World App Java/xml
if your using the original version of AIDE
You can name your app, use;
View Animator Views for the App Name and,
for the package name(next line) use:
com.aac.animatorexampleviews
Layout 1 layout file, main.xml; this page has the code for our View Animator layout; located at res/layout/main.xml, already created, just replace the code on this page with the code from our Example Code section and save the page.
We added the required ViewAnimator element, and then coded our views. We also coded a Linear Layout that includes our NEXT and PREV buttons.
res/drawable-hdpi folder; at the drawable folder we add all the images we are using for this app: afiestycat.png, cheetah.png, tiger.png. You can download these at the Example Code section, then copy/paste them into the drawable-hdpi folder of the app project.
Java 1 java class page; MainActivity.java; located at app/src/java/MainActivity.java. This page has the code that animates our views.
You can copy paste the code from the Example Code section to replace the code on page now and save the page.
Strings 1 strings.xml file; This file has the strings that contain the text for our app name and the text we added for some of the views. Text can also be added within the View itself; and usually is coded there when there is a single line or few words of text.
Manifest The androidmanifest.xml file is where you can code your 'app theme' name, code your 'intent filters', 'app theme', 'app icon', and declare any additional 'activities' you add.
You can also code your SDK min and target versions here; but since they are already coded in the build.gradle file they do not need to be coded here. This page was created and coded for us as we used a template app. We do not have to edit this page.
Build Gradle, this page has the code for the SDK min and target versions and our support libraries code if we need to add any to our app.
The support libraries code is added at the 'dependencies' section in the build.gradle file, and the SDK versions are added at the 'defaultConfig' section in the build.gradle file.
This file has been created for us and coded with the proper SDK min and target versions, so we don't have to edit those.
And, for this app we don't need to add any support libraries for our code classes, so we do not need to edit this page.
For this app, the build.gradle file is located at; AppProjects/ViewAnimatorViews/app/src.
To learn more about setting your SDK version numbers; and adding support libraries(dependencies), goto Tutorial 1 - Setting Build Gradle Config & Adding Dependencies.
Coding a Frame Animation
Prev Page
View All Tutorials
View Animator with Views
This is the App Photo - View Animator with Views
How To Use View Animator with Views
View Animator is a coding class introduced in android version 1.0, api 1. It is a code class for animating views.In our previous tutorial we coded a View Animator with an array for images. In this tutorial we are going to code a View Animator with Views. A view can be a TextView, an ImageView, a Button, or any combination of these elements.
For our View Animator, we coded a TextView, a TextView with an ImageView, a Button with text, a Button with an Image and text, and an ImageView.
To code these we added our required View Animator element, then we added our Views. For views that we wanted together like the TextView and Imageview, we put those within a LinearLayout container; that way, they will display as one view, with both elements, a TextView and the ImageView. This is the code.
To code our Button element with the Image and text, we simply coded a Button element, then added the Image and Text to it. The text is coded in our string named 'buttonwithimagetext', in our strings.xml file.
To put the image to the left of your text you can use the android:drawableLeft attribute as we have done. If you wanted the image to the right of the text then you would use android:drawableRight attribute in the button code. This is the code for the Button with an Image and Text.
Material Design Theme
We implemented the Material Design dark theme for our app theme. Because we are using a android/java/xml template app to create our app tutorials, the Material Theme Light app theme is added for us automatically in the styles.xml at res/value-v21 folder of our app project.
Because we want to change the theme color to the darker theme, we simply need to change the theme name in the styles.xml file from Theme.Material.Light to Theme.Material. You can copy paste the code for this from the Example Code section on this page.
Additional Reading at Android Developer Website:
View Animator
Creating - Naming Your App Using AIDE
When creating your app,(from left menu) choose:Create New Project;
Then, choose
New Android App(gradle, android Java/xml)
or
Hello World App Java/xml
if your using the original version of AIDE
You can name your app, use;
View Animator Views for the App Name and,
for the package name(next line) use:
com.aac.animatorexampleviews
The Coded Pages
For this app you will use these coded pages:Layout 1 layout file, main.xml; this page has the code for our View Animator layout; located at res/layout/main.xml, already created, just replace the code on this page with the code from our Example Code section and save the page.
We added the required ViewAnimator element, and then coded our views. We also coded a Linear Layout that includes our NEXT and PREV buttons.
res/drawable-hdpi folder; at the drawable folder we add all the images we are using for this app: afiestycat.png, cheetah.png, tiger.png. You can download these at the Example Code section, then copy/paste them into the drawable-hdpi folder of the app project.
Java 1 java class page; MainActivity.java; located at app/src/java/MainActivity.java. This page has the code that animates our views.
You can copy paste the code from the Example Code section to replace the code on page now and save the page.
Strings 1 strings.xml file; This file has the strings that contain the text for our app name and the text we added for some of the views. Text can also be added within the View itself; and usually is coded there when there is a single line or few words of text.
Manifest The androidmanifest.xml file is where you can code your 'app theme' name, code your 'intent filters', 'app theme', 'app icon', and declare any additional 'activities' you add.
You can also code your SDK min and target versions here; but since they are already coded in the build.gradle file they do not need to be coded here. This page was created and coded for us as we used a template app. We do not have to edit this page.
Build Gradle, this page has the code for the SDK min and target versions and our support libraries code if we need to add any to our app.
The support libraries code is added at the 'dependencies' section in the build.gradle file, and the SDK versions are added at the 'defaultConfig' section in the build.gradle file.
This file has been created for us and coded with the proper SDK min and target versions, so we don't have to edit those.
And, for this app we don't need to add any support libraries for our code classes, so we do not need to edit this page.
For this app, the build.gradle file is located at; AppProjects/ViewAnimatorViews/app/src.
To learn more about setting your SDK version numbers; and adding support libraries(dependencies), goto Tutorial 1 - Setting Build Gradle Config & Adding Dependencies.
EXAMPLE CODE - Code For This Tutorial
JUST copy the code for this tutorial App Name is 'View Animator Views' - located at AppProjects/ViewAnimatorViews in AIDE, open the AIDE app, then open App Projects, THEN select the 'View Animator Views ', app from your files hierachy(left menu); then click on any file from the app, like strings.xml Make sure at top of screen, the app name ViewAnimatorViews is there next to AppProjects like so: AppProjects/ViewAnimatorViews
, then you know you have the proper App.
Once a file is in the editor, you can edit, save it, then RUN your APP, Install,
and Open your app.
Make sure you SAVED EACH PAGE,(or choose automatic saving in AIDE settings) before you RUN your code. SAVE, RUN, INSTALL, OPEN, your App. Once it has been
installed on your tablet, you can open it Simply by Clicking on the Android little green App Icon,with the wording 'ViewAnimatorViews
' on your tablet. It will
be with your other installed apps.
If you make further changes to this App, you need to SAVE, RUN, UPDATE, INSTALL, OPEN the app again.
This free script provided by
JavaScript
Kit
AIDE for creating Android Apps on your tablet or cell phone(android).
Free and Paid.
GoTo Aide
ANDROID STUDIO - for creating Android Apps on your desktop computer.
Free to Install and Use
Learn more - Android Studio
The Java XML files we code(example codes) and the Android Apps we create in our Free Tutorials are compatible with Android Studio and AIDE. Just choose Java XML as your Programming Language.
You May Like:
Sushi Rolls Make Sushi at Home | Taste World Wines Flavours and Aromas