
Tutorials 2022
View All Tutorials
For this tutorial, we are going to develop a 'Four Button App' with two color blends, and also implement a 'back arrow' on the action bar on screen one. On that same action bar, we will also add a customized logo and color.
Because we are making each button clickable, our app has four individual screens or pages. The apps' topic is travel making it easy to add travel destinations to each of the screens.
Material design also introduced and updated system generated or default designs. Basically you could choose a dark style(Theme.Material) or a light style(Theme.Holo.Light), and this gives your app a dark or light color action bar, screen color, and any menus you have in your app.
These are pre coded for you in the styles.xml file of your app, and generated when you create an app. Dark style is usually the default. If you prefer a light style then simply changing the code in the styles.xml changes the color.
While developing Android apps, eventually you'll probably want to add some creativeness to your app by way of colors and widgets to add more app appeal.
The Material design colors are a good idea as you can make a bland looking app quite nice with just a few blended colors.
For this tutorial, we'll add two color blended colors to our four buttons on our homepage and also add a travel image to them.
On screen one we are adding a different color to the top of screen 'action bar', adding a logo to it; and an 'arrow' which when clicked, returns the user to the previous page or homepage of the app.
All screens have text added, and we added the same background color to screens one, two, three, and four.
Screens two, three and four have text added and a header name for the travel destination.
All screens have the 'Theme.Material' dark style, system default which gives the 'action bar' at top of screen the same dark color. We can however, change the color, title; add an icon, and a back arrow to screen one by adding some code to its' java class page.
By viewing screens two, three, four and then screen one, you can see the way you can customize the action bar in your apps.

Creating Our New App
Open AIDE, Select Create New Project, from the left menu, or center menu hierachy of files; and do the following:
Select

choose NEW ANDROID APP(Gradle/Android SDK/java/xml) if your using the newest version of AIDE.
Choose HELLO WORLD example app template(java/xml);if your using an older version of AIDE,
For app name; type 'Color Blends '
For app package name type: com.aac.example_blends_buttons
Click Create
Your new app is now created for you - named 'Color Blends'. For now, you will have the little green Android image as your app's icon. Once you add all your app images and run your app with the updated and new pages you create, you'll see the Travel icon instead.
AIDE automatically opens your new app in the editor for you.
For our app 'Color Blends", we are adding two orange colors, just different shades. So we add the code number for the first color in Button 1 and 3; and for our second color we add to Button 2 and 4. These are added to our layout xml file - main.xml. As you see by looking at the image of our app, each button has a different look because we added the blended colors. Goto The code at 'Example Code' on this page to see the actual coded page.
For our added image, we just used a small travel image travel_icon.jpg(145x145).
Then with image editing software; Gimp(Free), the color blend was added to the perimeter of the image making it blend with our chosen Button color. So, basically I made a square shape of the color i wanted. Then the image is pasted into the center of my color square. Then I crop that to the size i want.
Looking at this images you can see the travel image with the blended colors added.


These are included in the main.xml file code as drawables. We want them to be positioned 'Left' in our buttons, so we use 'drawableLeft' attribute in our code.
Text For Buttons-
For our button text, we used the 'Hint' code and for its' color, 'textColorHint' is used. You can make the button whatever height you want. The button background colors- our orange blends is added using the 'android;background' code. See all these at the 'Example Code' section on this page.
We only have 4 buttons for this app; however had we added additional buttons we would add the "ScrollView' element to our main.xml code also. This allows for scrolling down the screen when the content exceeds the perimeter of our display screen. On newer versions of Android it is included by default.
This next image shows a 'light style' which has a white action bar with dark colored text. Each screen would be white also. Because we changed the background for each screen including our homepage(main.xml); the backgrounds are now a light shade of yellow. To change background colors for each app screen just code the color you want in the LinearLayout element.
Also notice the Travel icon as we added it without adding the color blends to it or giving it a round shape so its a simple square image. Just different ways you can design your homepage buttons.

Dark Style - Color Blends App
So with dark style chosen, all the app pages(screens) are dark and the action bar which runs along the top of your screens is also dark colored. If you want a specific page or action bar to be a different color you can customize it. For this app 'Color Blends'; at screen 1, we are going to add a color, some text, a logo, and an 'arrow back' which takes the user back to the homepage. All codes for this are at the 'Example Code' section.
For this app we require a main.xml, MainActivity.java; these are already created for us so we only need to replace the code with our code from Example Code(Color Blends) on this page.
Since our buttons are clickable, we must create four screens or pages. Each button goes to its' own screen. These are xml files, and each xml file requires a java class page to match with it.
We must create the new pages we will require: You can name them as you want; I use words that match them somehow- screen_one.xml corresponds to FirstScreen.java; doing so just simplifies your coding.
xml pages
screen_one.xml
screen_two.xml
screen_three.xml
screen_four.xml
java class pages
FirstScreen.java
SecondSreen.java
ThirdScreen.java
FourthScreen.java
screen_one.xml
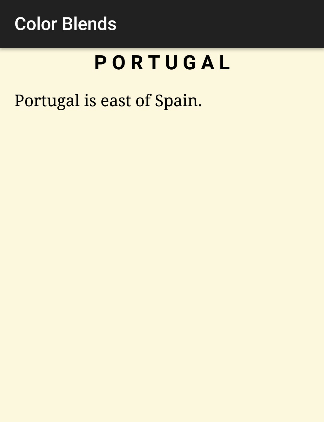
Screen one has the customized 'action bar'. We added color, text, a logo and the 'arrow back' button, as shown in this image.

Our action bar not customized "dark style', at screen two. This is the typical 'dark style' appearance.
We code our changes for our 'action bar' in our java class file for screen one - FirstScreen.java.
First, create the page, then replace the code with the code from our Example Code section on this page and Save the page. Do the same for each java class page you create. And, camel case your letters for java pages, so, first letter for each word is capped.
FirstScreen.java

As we want to make changes to the action bar on screen_one.xml; we put the code in FirstScreen.java. We must include the 'get action bar' code. Then we just add code for each action bar selection we want to include. We add the code for color, title, and the arrow.
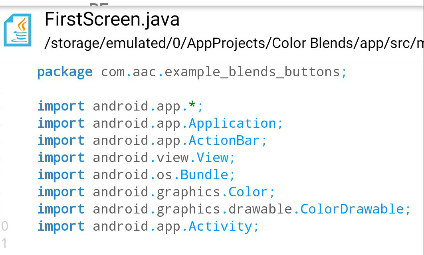
For this app we also must add: actionbar, color, and color drawable import statements as seen in this image.
Additional Reading on 'Back Arrow'; Action Back Arrow - At Android Developer Website
The other xml pages we must create.
screen_two.xml
Has a Header Title and some text so we must code 2 'TextViews' in our screen_two.xml coding. screen_three.xml
Also has a Header Title and some text.
screen_four.xml
Also has a Header Title and some text.
The background color for each of these screens(pages) is coded at the LinearLayout element on each of the pages. So, each screen in your app can have a different color.
When creating your java pages, leave no space of words.
FirstScreen.java
SecondSreen.java
ThirdScreen.java
FourthScreen.java
For xml pages, you can have space but use _ to separate words. And, use lowercase. Same applies to image names;.use lowercase and _ for spacing.
Update These Also
AndroidManifest.xml - is already created for us, but we have to change the code so easier just to copy paste from the Example Code section and then Save the page.
Also note in this next image; the Activity element coding for FirstScreen.java compared to the code for the other java pages. FirstScreen requires this code for the 'back arrow' at the top of Screen one.(Spain). If we do not include it the 'arrow' function doesn't execute. This code basically tells the arrow to return the user to the homepage of the app.

If you wanted to add the 'back arrow' (aka code name; setDisplayHomeAsUpEnabled) to all screens in your app, then you would add this exact code to manifest 'Activity' for each java page; and add the exact code from FirstScreen.java (starting at GetActionBar) to the other java pages. If you wanted each page to have a different actionbar color, icon, title make the changes in the java pages.
strings.xml - we also must change/update the code on this page; easiest just to copy paste from the Example Code to replace what's on the page now.
build.gradle - this file might have to be updated for this Color Blends app. It depends on your AIDE version and also the version of Android your using. If your phone is Android 6 or greater then using the 'compile version', 'build tools version', "min SDK version', and 'targetSDK version' as shown in our Example Code should be good. If your AIDE shows differently then just manually change the numbers for each version category mentioned here or copy paste all the coded page.
This app does not require any 'dependencies' to be added. If it did, we would add them in this build gradle file at 'dependencies'.
This app has five images; one for the apps' icon, 2 images on screen one, and 2 travel image buttons on the home screen.(main.xml). Save each image to your smartphone or tablet, and then copy or move them to the res/drawable-hdpi folder of your app project.
In Summary
Add the code from the Example Code on this page to each of these specific pages and Save them as you update them.
Once you create and copy all codes to all the pages, and save all images to the drawable-hdpi folder, you can Run your app, and Install it. Just follow the Run prompts.
Tip: You do not include the file extension when coding an image; just the image name.
drawable/travel_orange_130.png" incorrect
drawable/travel_orange_130" correct
TIPS
Creating Pages
Check for the filename extensions of page your creating. If for example, your creating a new Java page, (java folder)you want to see pages already created in that folder that have the .java file extension. Click 'create new java class' to create your page.
For xml files, you must create these in the 'res/layout' folder of your app project. Click 'add new xml file', to create your page.
Additional Reading on coding, at Android Developer website
Gohere
This Tutorial: Action Bar & Color Blends
View All Tutorials
Android App- Customized Action Bar and Color Blended Buttons with Image
Added March 2022For this tutorial, we are going to develop a 'Four Button App' with two color blends, and also implement a 'back arrow' on the action bar on screen one. On that same action bar, we will also add a customized logo and color.
Because we are making each button clickable, our app has four individual screens or pages. The apps' topic is travel making it easy to add travel destinations to each of the screens.
Material Design - Color Blends
In Android, you can use colors to create color blends. Blends became popular with Android 5 (Api 21), Material Design - when many of the newly designed home screens were color coordinated to give a nicer look to an apps' interface design. Since then its become the standard in app design.Material design also introduced and updated system generated or default designs. Basically you could choose a dark style(Theme.Material) or a light style(Theme.Holo.Light), and this gives your app a dark or light color action bar, screen color, and any menus you have in your app.
These are pre coded for you in the styles.xml file of your app, and generated when you create an app. Dark style is usually the default. If you prefer a light style then simply changing the code in the styles.xml changes the color.
While developing Android apps, eventually you'll probably want to add some creativeness to your app by way of colors and widgets to add more app appeal.
The Material design colors are a good idea as you can make a bland looking app quite nice with just a few blended colors.
For this tutorial, we'll add two color blended colors to our four buttons on our homepage and also add a travel image to them.
On screen one we are adding a different color to the top of screen 'action bar', adding a logo to it; and an 'arrow' which when clicked, returns the user to the previous page or homepage of the app.
All screens have text added, and we added the same background color to screens one, two, three, and four.
Screens two, three and four have text added and a header name for the travel destination.
All screens have the 'Theme.Material' dark style, system default which gives the 'action bar' at top of screen the same dark color. We can however, change the color, title; add an icon, and a back arrow to screen one by adding some code to its' java class page.
By viewing screens two, three, four and then screen one, you can see the way you can customize the action bar in your apps.
New App - Color Blends
We are going to create a new app for this tutorial, and name is -'Color Blends'
Creating Our New App
Open AIDE, Select Create New Project, from the left menu, or center menu hierachy of files; and do the following:
Select
choose NEW ANDROID APP(Gradle/Android SDK/java/xml) if your using the newest version of AIDE.
Choose HELLO WORLD example app template(java/xml);if your using an older version of AIDE,
For app name; type 'Color Blends '
For app package name type: com.aac.example_blends_buttons
Click Create
Your new app is now created for you - named 'Color Blends'. For now, you will have the little green Android image as your app's icon. Once you add all your app images and run your app with the updated and new pages you create, you'll see the Travel icon instead.
AIDE automatically opens your new app in the editor for you.
Using Color Blends
Adding two blended colors is easy to do in Android. First find the Material Design color schemes. You can do a search to find them or browse the Android Developer website which also has articles on designing your app using Material Design color choices. Material Design with Colors.For our app 'Color Blends", we are adding two orange colors, just different shades. So we add the code number for the first color in Button 1 and 3; and for our second color we add to Button 2 and 4. These are added to our layout xml file - main.xml. As you see by looking at the image of our app, each button has a different look because we added the blended colors. Goto The code at 'Example Code' on this page to see the actual coded page.
For our added image, we just used a small travel image travel_icon.jpg(145x145).
Then with image editing software; Gimp(Free), the color blend was added to the perimeter of the image making it blend with our chosen Button color. So, basically I made a square shape of the color i wanted. Then the image is pasted into the center of my color square. Then I crop that to the size i want.
Looking at this images you can see the travel image with the blended colors added.
These are included in the main.xml file code as drawables. We want them to be positioned 'Left' in our buttons, so we use 'drawableLeft' attribute in our code.
Text For Buttons-
For our button text, we used the 'Hint' code and for its' color, 'textColorHint' is used. You can make the button whatever height you want. The button background colors- our orange blends is added using the 'android;background' code. See all these at the 'Example Code' section on this page.
We only have 4 buttons for this app; however had we added additional buttons we would add the "ScrollView' element to our main.xml code also. This allows for scrolling down the screen when the content exceeds the perimeter of our display screen. On newer versions of Android it is included by default.
Styles
For this app we used the 'dark' style, which is usually the default when creating apps in AIDE with the templates. As previously mentioned, you can change it to the 'light style" as well.This next image shows a 'light style' which has a white action bar with dark colored text. Each screen would be white also. Because we changed the background for each screen including our homepage(main.xml); the backgrounds are now a light shade of yellow. To change background colors for each app screen just code the color you want in the LinearLayout element.
Also notice the Travel icon as we added it without adding the color blends to it or giving it a round shape so its a simple square image. Just different ways you can design your homepage buttons.
Dark Style - Color Blends App
So with dark style chosen, all the app pages(screens) are dark and the action bar which runs along the top of your screens is also dark colored. If you want a specific page or action bar to be a different color you can customize it. For this app 'Color Blends'; at screen 1, we are going to add a color, some text, a logo, and an 'arrow back' which takes the user back to the homepage. All codes for this are at the 'Example Code' section.
Where Code is Coded
For this app 'Color Blends' - In the AIDE editor you can browse amongst your app screens(pages).For this app we require a main.xml, MainActivity.java; these are already created for us so we only need to replace the code with our code from Example Code(Color Blends) on this page.
Since our buttons are clickable, we must create four screens or pages. Each button goes to its' own screen. These are xml files, and each xml file requires a java class page to match with it.
We must create the new pages we will require: You can name them as you want; I use words that match them somehow- screen_one.xml corresponds to FirstScreen.java; doing so just simplifies your coding.
xml pages
screen_one.xml
screen_two.xml
screen_three.xml
screen_four.xml
java class pages
FirstScreen.java
SecondSreen.java
ThirdScreen.java
FourthScreen.java
screen_one.xml
Screen one has the customized 'action bar'. We added color, text, a logo and the 'arrow back' button, as shown in this image.
Our action bar not customized "dark style', at screen two. This is the typical 'dark style' appearance.
We code our changes for our 'action bar' in our java class file for screen one - FirstScreen.java.
First, create the page, then replace the code with the code from our Example Code section on this page and Save the page. Do the same for each java class page you create. And, camel case your letters for java pages, so, first letter for each word is capped.
FirstScreen.java
As we want to make changes to the action bar on screen_one.xml; we put the code in FirstScreen.java. We must include the 'get action bar' code. Then we just add code for each action bar selection we want to include. We add the code for color, title, and the arrow.
Import Statements
Import statements must be included for any new methods you include with your java coding. For each app created there are basic imports included for you because we create our app using a template app.For this app we also must add: actionbar, color, and color drawable import statements as seen in this image.
Additional Reading on 'Back Arrow'; Action Back Arrow - At Android Developer Website
The other xml pages we must create.
screen_two.xml
Has a Header Title and some text so we must code 2 'TextViews' in our screen_two.xml coding. screen_three.xml
Also has a Header Title and some text.
screen_four.xml
Also has a Header Title and some text.
The background color for each of these screens(pages) is coded at the LinearLayout element on each of the pages. So, each screen in your app can have a different color.
When creating your java pages, leave no space of words.
FirstScreen.java
SecondSreen.java
ThirdScreen.java
FourthScreen.java
For xml pages, you can have space but use _ to separate words. And, use lowercase. Same applies to image names;.use lowercase and _ for spacing.
Update These Also
AndroidManifest.xml - is already created for us, but we have to change the code so easier just to copy paste from the Example Code section and then Save the page.
Also note in this next image; the Activity element coding for FirstScreen.java compared to the code for the other java pages. FirstScreen requires this code for the 'back arrow' at the top of Screen one.(Spain). If we do not include it the 'arrow' function doesn't execute. This code basically tells the arrow to return the user to the homepage of the app.
If you wanted to add the 'back arrow' (aka code name; setDisplayHomeAsUpEnabled) to all screens in your app, then you would add this exact code to manifest 'Activity' for each java page; and add the exact code from FirstScreen.java (starting at GetActionBar) to the other java pages. If you wanted each page to have a different actionbar color, icon, title make the changes in the java pages.
strings.xml - we also must change/update the code on this page; easiest just to copy paste from the Example Code to replace what's on the page now.
build.gradle - this file might have to be updated for this Color Blends app. It depends on your AIDE version and also the version of Android your using. If your phone is Android 6 or greater then using the 'compile version', 'build tools version', "min SDK version', and 'targetSDK version' as shown in our Example Code should be good. If your AIDE shows differently then just manually change the numbers for each version category mentioned here or copy paste all the coded page.
This app does not require any 'dependencies' to be added. If it did, we would add them in this build gradle file at 'dependencies'.
This app has five images; one for the apps' icon, 2 images on screen one, and 2 travel image buttons on the home screen.(main.xml). Save each image to your smartphone or tablet, and then copy or move them to the res/drawable-hdpi folder of your app project.
In Summary
Add the code from the Example Code on this page to each of these specific pages and Save them as you update them.
Once you create and copy all codes to all the pages, and save all images to the drawable-hdpi folder, you can Run your app, and Install it. Just follow the Run prompts.
Tip: You do not include the file extension when coding an image; just the image name.
drawable/travel_orange_130.png" incorrect
drawable/travel_orange_130" correct
TIPS
Navigating The App Project Hierachy
To view A FILE do either: from right menu choose FILES or GOTO, this will show the apps files along the top of editor, dropdown, and left side menu. After editing a file, SAVE it, right side menu, choose SAVE.Creating Pages
Check for the filename extensions of page your creating. If for example, your creating a new Java page, (java folder)you want to see pages already created in that folder that have the .java file extension. Click 'create new java class' to create your page.
For xml files, you must create these in the 'res/layout' folder of your app project. Click 'add new xml file', to create your page.
Additional Reading on coding, at Android Developer website
Gohere
In Summary,
App Name is 'Color Blends' - located at AppProjects/ColorBlends in AIDE; OPEN the AIDE app, then open App Projects, THEN select the 'Color Blends', app from your files hierachy(left menu); then DOUBLE CLICK on any file from the app, like strings.xml, to open it in AIDE.
Make sure at top of page, the app name 'Color Blends' is there next to AppProjects like so: AppProjects/ColorBlends, then you know you have the proper App.
Once a file is in the editor, you can edit, save it, then RUN your APP, install, to Open your app.
You can open the app Simply by Clicking on the Android little green App Icon(Travel Icon),with the wording 'Color Blends' on your tablet. It will be with your other installed apps.
If you make further changes to this App, you need to SAVE, RUN, UPDATE, INSTALL, OPEN the app again.
EXAMPLE CODE - Code For This Tutorial.
JUST copy the code for this tutorial from the Example Code in this section.

JUST copy the code for this tutorial from the Example Code in this section.
This free script provided by
JavaScript
Kit
AIDE for creating Android Apps on your tablet or cell phone(android).
Free and Paid.
GoTo Aide
ANDROID STUDIO - for creating Android Apps on your desktop computer.
Free to Install and Use
Learn more - Android Studio
The Java XML files we code(example codes) and the Android Apps we create in our Free Tutorials are compatible with Android Studio and AIDE. Just choose Java XML as your Programming Language.
You May Like:
Make Sushi Rolls Taste World Wines Flavours and Aromas
AndroidAppCoding.com, Free Coding Tutorials; All Rights Reserved